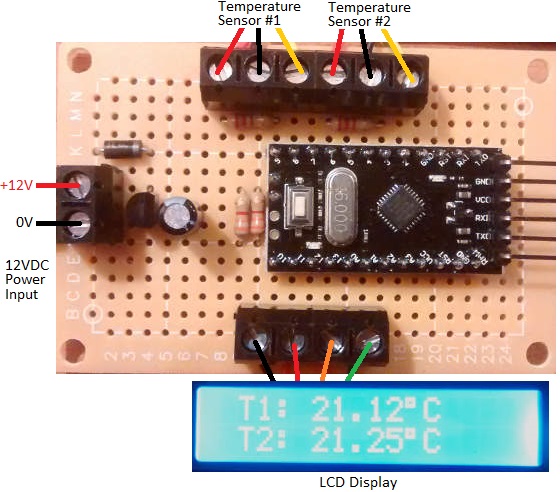
Pictured below is a two-channel thermometer we recently built for a customer. This device takes inputs from two ds18b20 temperature sensors and displays their measured temperatures on a 1602 LCD display module. The thermometer is built around an Arduino Pro Mini.
Below is the full Arduino sketch (code) for our device.
See this guide to Connecting an I2C Display to Arduino for the LCD connections. We have added the necessary 3k3 pull up resistors between pin A4 and 5V, and pin A5 and 5V – click here to read about I2C Pull Up Resistors. We have also used an external 5V regulator rather than relying on the 5V regulator built into the Arduino Pro Mini, and added reverse polarity protection on the input with a 1N4001 diode.
// © reuk.co.uk - 2018
// Double Thermometer with Display.

// For the DS18B20 temperature sensors.
#include <OneWire.h> // (https://github.com/PaulStoffregen/OneWire)
#include <DallasTemperature.h> // (https://github.com/milesburton/Arduino-Temperature-Control-Library)

// Data wires are plugged into pins 2 and 3 on the arduino.
#define ONE_WIRE_BUS 2
#define SECOND_BUS 3

// For the 1602 LCD module.
#include <Wire.h>
#include <LCD.h>
#include <LiquidCrystal_I2C.h>
#define I2C_ADDR 0x27 // Note that some modules have address 0x3F

#define BACKLIGHT_PIN 3
#define En_pin 2
#define Rw_pin 1
#define Rs_pin 0
#define D4_pin 4
#define D5_pin 5
#define D6_pin 6
#define D7_pin 7
LiquidCrystal_I2C lcd(I2C_ADDR,En_pin,Rw_pin,Rs_pin,D4_pin,D5_pin,D6_pin,D7_pin);

// Setup a oneWire instances to communicate with OneWire devices.
OneWire oneWire(ONE_WIRE_BUS);
OneWire secondWire(SECOND_BUS);

// Pass our oneWire reference to Dallas Temperature.
DallasTemperature sensor1(&oneWire);
DallasTemperature sensor2(&secondWire);

float sensorOneTemperature = 0.0;
float sensorTwoTemperature = 0.0;

void setup(void)
{
 // Start up the temperature sensor library.
 sensor1.begin();
 sensor2.begin();

 // Set the temperature sensor resolutions to 11 bit
 // ADC (12 bit is much slower but higher resolution).
 sensor1.setResolution(11);
 sensor2.setResolution(11);

 // Initialise the LCD.
 lcd.begin (16,2); // For a 16x2 character LCD
 // Switch on the LCD backlight.
 lcd.setBacklightPin(BACKLIGHT_PIN,POSITIVE);
 lcd.setBacklight(HIGH);
 // Clear the LCD screen.
 lcd.clear();
}

void loop(void)
{
 // Read in the temperatures of the two sensors.
 sensor1.requestTemperatures(); // Read temperature of sensor1
 sensorOneTemperature = sensor1.getTempCByIndex(0);
 sensor2.requestTemperatures(); // Read temperature of sensor2
 sensorTwoTemperature = sensor2.getTempCByIndex(0);

 // Display the temperatures of the sensors on the LCD.
 displayTemperatures();
}

void displayTemperatures(){
 // Display sensor1's temperature.
 lcd.setCursor(0,0);
 lcd.print(" T1: ");
 lcd.print(sensorOneTemperature,2);
 lcd.print((char)223);
 lcd.print("C ");

 // Display sensor2's temperature.
 lcd.setCursor(0,1);
 lcd.print(" T2: ");
 lcd.print(sensorTwoTemperature,2);
 lcd.print((char)223);
 lcd.print("C ");
}
If you need any kind of bespoke thermometer or thermostat, please email neil@reuk.co.uk with details of your specific requirements.