Solar water heating is probably the easiest way to use less energy and save money. Payback time – i.e. the time taken for the capital cost of the complete system to be offset by reduced energy bills – can be under a year for DIY systems made from salvaged parts, and as little as 5 years even for the latest commercial evacuated tube solar water heaters.
In previous articles we have looked at DIY concentrated solar water heating, and a very basic solar water heater which can be put together by anyone in just a couple of hours using easy to find parts.
In this article we will expand on our article DIY Solar Water Heating by describing the steps involved in putting together a flat plate collector solar water heating system.
DIY Flat Plate Collector Solar Water Heater
This system was put together by Stephen and John in Wiltshire as a working prototype to test the concept before building a system which will eventually heat sufficient water for a whole household. The prototype is pump driven using a 12V car windscreen washer pump (the final system will probably be a pumpless thermosyphon system to keep it simple and to reduce costs and later maintenance).
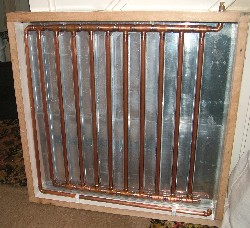
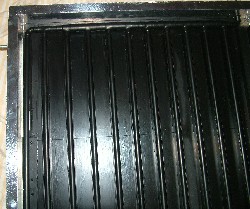
Pictured above is the pipework for the flat plate collector. A mixture of 22mm and 15mm diameter copper pipes were fitted in a wooden frame and mounted onto heavy duty aluminium sheeting. The top and bottom pipes of the array were 22mm diameter, and the vertical pipes were 15mm diameter connecting to the 22mm pipes with reducing Tee joints (22-15-22). Heat sink compound was used between the copper and aluminimum to help heat conduction.
NEW Click here to read our new introductory guide to Soldering Copper Pipe.
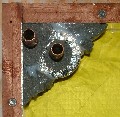
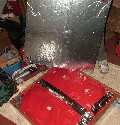
To prevent heat from escaping from the back of the collector, it was heavily insulated in layers. The first layer of insulation was covered with foil and then held in place with rip stop nylon (1) – the internal piping (2) was insulated seperately. Four polythene bags of fibre-glass insulation (3) were then added and taped in place before the foil covered backboard (4) was fitted.
(1) |
(2) |
(3) |
(4) |
The back board was made from industry cast-off 3 ply 6mm hardwood. The rest of the frame was made from timber reclaimed from an discarded staircase – some pine and West Indian mahogany.
Hammerite was then painted onto the wooden exterior of the solar collector to protect it from the weather, and the heat sink was painted with heat resistant black paint (Very High Temperature Engine Enamel Paint from Halfords) to maximise heat absorption.
A flat sheet of dimpled toughened glass (£33 from Roman Glass) was fixed on the front of the panel with silicon sealant (A) and aluminium angle strips then added (B) and sealed with silicon sealant to keep the rain out and the hot air in.
(A)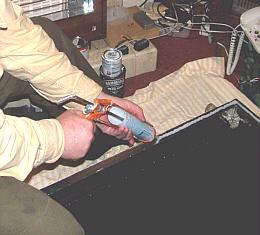 |
(B) |
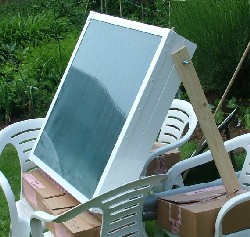
The finished flat plate solar collector was then ready to be tested in the sunshine.
The Heat Exchanger
This prototype solar water heater is a closed system. Water is pumped around through the solar collector and then to the heat exchanger. As the solar heated water flows through the heat exchanger (which sits in an insulated tank), the water in the tank gets hotter, and the water in the heat exchanger gets colder. The water in the heat exchanger then continues its journey back through the pump and onto the solar collector again, so in time the water in the bucket gets hotter and hotter.
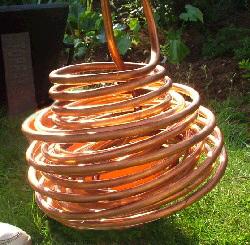
The heat exchanger (pictured above) was made up of 15 metres of 10mm copper pipe coiled around. That gives the heat exchanger a total surface area of almost 0.5 square metres of copper transferring heat from the solar heated water in the pipe to the bucket of water to be heated.
A set of pipe bending springs (lubricated with light silicon grease) was used to enable the pipe to be bent around (without it folding). The pipe is simply inserted into the spring and bent as required. The 10mm pipe bending spring pictured above is available for just £2.25 plus postage on eBay (click here to search eBay for pipe bending springs – 10mm, 15mm, and 22mm springs are all available).
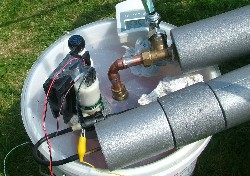
The image above shows the pipework entering and leaving the top of the 15 litre bucket of water to be heated. A car windscreen washer pump was used to circulate water around the prototype solar heating system. A PV solar powered fan is shown stuck to the pump to prevent it from overheating.
To slow the pump down, the input voltage was reduced to 8 Volts (rather than the rated 12V), and it was operated in manual short bursts to give the water in the solar panel the chance to heat up. Using the pump in this manner it never got hotter than the water it was pumping. Ideally a thermostat would have been used to automatically trigger the pump when the water in the solar panel reached a chosen temperature, or a certain number of degrees above the temperature in the bucket.
For the final system a solar water heating pump controller should be used such as our Solar Pump Controller with Relay which will only turn the pump on when the solar panel temperature is a certain number of degrees or more above the temperature of the water in the storage tank (bucket), and turn the pump off again when that positive temperature differential has fallen to a lower value.
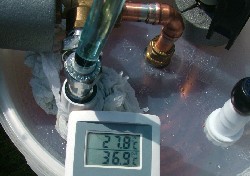
A digital indoor/outdoor thermometer was used to display the ambient air temperature (27.8 degrees C in May in the UK) and the temperature of the 15 litres of water in the bucket (36.9 degrees C in this image). The water in the bucket heated by the 0.8 square metre solar flat plate collector eventually reached 41 degrees (hot bath temperature) in just over one hour starting from just 16 degrees C and despite the bucket not being insulated (though sitting on a piece of polystyrene).
 |
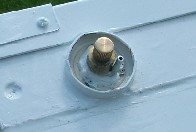 |
Bleed Valve
A bleed valve is an essential component of any closed system. Bleed valves are found on domestic radiators amongst other things and enable trapped air to be removed from the system. When filling the system the first time the bleed valve needs to be left open until water starts to come out. At this point you know that the system is full of water with no trapped air, and so the bleed valve can be closed tight.
Every now and then – how frequently depends on the integrity of the system – it is necessary to bleed the system to release any air bubbles. At the same time the water (or anti-freeze) in the system can be topped up.
Note in the images above how a small glass jam jar was used in this prototype system to protect the bleed valve from the weather while still enabling easy access (by unscrewing the jar from its lid).
Filling the Closed System
In order to fill the closed circulation system before first use liquid was poured through a funnel (held above the highest point of the system), down through transparent plastic pipe (so the flow and level of fluid taken up by the system could be seen), and through a standard radiator tap into the system just before the heat exchanger. When full and bled for air, and with the pump running, the radiator tap was closed to seal the circulation system.
The prototype system was filled with tap water dyed with blue food colouring (so leaks could be identified), however anti-freeze will be used in the final system.
Time and Cost
Altogether John and Stephen have so far spent 24 working hours together as a team on this project. The total cost of items purchased (excluding the PV solar system used to power the fan and pump) is £240. Of that, £100 was spent on pipe and fittings, £33 on glass, and £25 on paint and primer. While there were some items obtained free of charge or recycled (such as the bucket, insulation, aluminimum sheet and pump) it would certainly have been possible to put together a similar solar water heating system for under £100 building the system entirely around scrounged junk.
Future Developments
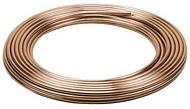
Stephen and John plan to put together a second prototype solar collector, this time using microbore copper pipe (pictured above) in a snake configuration to compare how effective it is in comparison with the existing prototype. It will certainly be cheaper and easier to assemble since there will be far less fittings (and associated soldering) required. At current (article updated January 2014) copper prices, a 25 metre length of 10mm microbore can be purchased for around £60 (double the cost in 2008!) in the UK. Copper pipe is also commonly available in 6mm, 8mm and 12mm diameters.