Hen House Door Controller with Sounder and Door Locking Solenoid

Pictured below is another special order hen house door controller we have made on request. Our standard dawn/dusk door controller is detailed here: Automatic Dawn/Dusk Hen House Door Controller. For this customer we have added a couple of new features – a sounder/siren and a door locking solenoid.

Hen house door controller with sounder and door locking solenoidThe door is opened and closed automatically using a light detector and some microcontroller logic to determine when it is dawn and dusk respectively.

30 seconds before the door opens or closes and while the door is in motion, a sounder goes off which will hopefully train the birds to realise that the door is opening or closing so that they know what to do; and a solenoid door lock is used to ensure that the door is kept securely closed at night time (since in this particular case a full size shed door is being used instead of the usual drop down bird-sized door).

If you need any type of poultry house door controller, email neil@reuk.co.uk with details of your requirements.

Dawn Dusk Lighting Controller with Regulated Output

Pictured below is a modification of our standard Mini REUK Dawn/Dusk Lighting Controller which has the addition of a regulator on the output so that it can be connected directly to LED lighting, and connections to enable a PV solar panel to be connected to the battery via the board.

REUK Dawn Dusk Lighting Controller with Regulated 12V OutputWe used an LM2940CT-12 regulator on the output side which will supply up to 10 Watts of 12.0V output to protect sensitive LED lighting from excessive voltage from the solar charged battery. (If the battery voltage falls below around 12.3V, the output voltage will fall to around 0.3-0.5V below the battery voltage).

We added a Schottky Diode to solar panel input so that the battery will not drain charge through the solar panel at night. A Schottky type diode was chosen as only around 0.3V of solar voltage is dropped through it compared to the 0.6V+ typically dropped through a standard silicon type diode.

Header Tank Filling Pump Controller

Pictured below is a controller we have just finished for a customer. We make a lot of rainwater toilet flush pump controllers, but this one is a little different from the norm.

Automatic header tank filling pump controller with time delay and use programmingThis controller is for a pump with its own integrated run-dry float switch protection. A second float switch is located in the header tank. When the header tank float switch goes low (as the water level drops), a user programmable (1 to 99 minutes) timer starts a countdown. When the timer has elapsed, the pump is switched on with the on board relay, and is run until the float switch goes high on the increasing water level.

This version will work well for situations in which water is taken regularly from the header tank, and in particular in situations in which water will be taken from the header tank a few times typically during the timer countdown after the water level first used – e.g. multiple people coming home at the same time and all using the toilet.

The advantage of this system is that only one float switch is needed in the header tank (and there is no need to estimate the time taken to fill the tank by the pump etc).

The disadvantage of this system is that sometimes when the header tank is not being used, the water level will drop because of evaporative losses or leaks in the pipework etc. To mitigate against this, we set up the controller to run the pump for a minimum of 30 seconds each time it is turned on, and also to require one continuous second of changed float switch condition before any action is taken so that turbulence is ignored and to avoid multi-switching (which could rapidly damage the pump).

If you need a pump controller for your well, sump, rainwater toilet flushing, etc, then please email neil@reuk.co.uk with details of your exact requirements.


Timer for Atlantic Crossing Balloon

Pictured below is a timer we made recently to help conserve battery power for the telemetry for an attempted balloon crossing of the Atlantic.

Timer for Atlantic balloon crossing telemetryThe payload of the balloon includes a GPS transmitter and an RTTY beacon so that the flight of the balloon can be tracked. Due to weight considerations, there is a limit to the size of the battery pack which can power these, and therefore there is a risk that the battery will run flat before the balloon (hopefully) lands in Europe after crossing the Atlantic from New York state.

Therefore, we were commissioned to make a secondary timer which would supply power to the RTTY beacon only for 15 minutes in every hour, and also to supply power to he GPS transmitter only when it is likely to be over land – for the first 7 hours and then again after a couple of days have passed. For this we used a PICAXE microcontroller because of its lower power consumption.

GPS module and RTTY beacon for Atlantic balloon crossing telemetry with ArduinoThe GPS and RTTY modules to be powered are pictured above connected to the Arduino Nano and Arduino Uno which control them – both relatively high power consumption devices themselves. Future flights will reduce weight and power consumption by connecting the GPS, and RTTY to a single Arduino which will also put itself into sleep mode to conserve power.

Balloon flight to near spaceWe were previously involved in an amateur balloon flight to the lower stratosphere reaching an altitude of 120,000 feet during which the picture above was taken which clearly shows the curvature of the Earth and the edge of the atmosphere. We made the timer which automatically severed the connection between the balloon and the payload after a fixed time to comply with FAA requirements.

Size Comparison of Pyboard with Raspberry Pi and Arduino UNO

We have just received our Pyboard – a prototyping platform that runs Micropython which is an implementation of the popular Python programming lanuage.

Micropython PyboardAbove is the Pyboard in the hard shell padded case in which it arrived. It looks to be very well made, sturdy, and best of all, physically very small.

Size comparison between Pyboard, Raspberry Pi B+ and Arduino UNOThe photo above shows just how small the Pyboard is in comparison with the Raspberry Pi Model B+, and an Arduino UNO.

We have lots of projects in the pipeline for which we would previously have used a Raspberry Pi, but the simplicity, size, and much lower power consumption of the Pyboard will often make it the obvious option.

Nabduino Remote Access Board

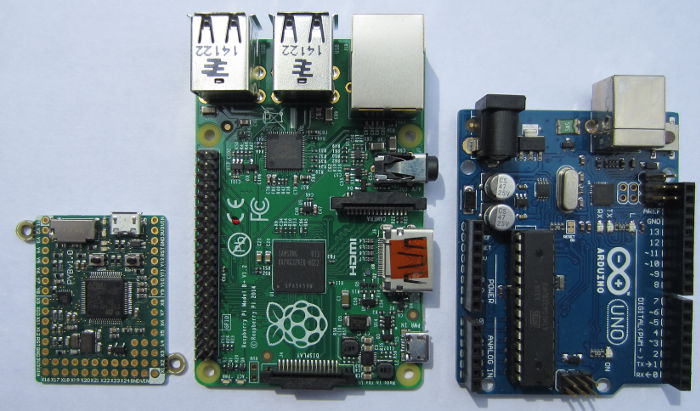
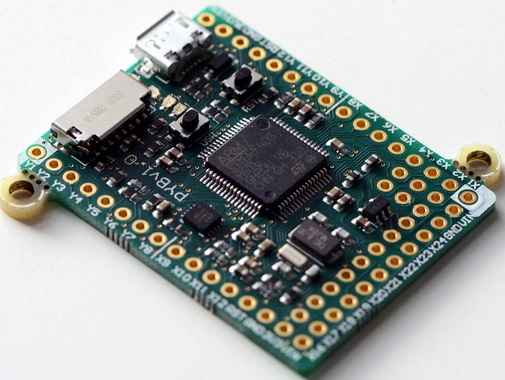
Pictured below is Nabduino – an “open source peer-to-peer remote access embedded board with a user modifiable web-interface developed by Nabto“.

Nabduino board

This small board (available to purchase here: buy Nabduino) can be accessed via a direct encrypted connection through a firewall without the need to change the firewall settings of your router.

If for example you set up a server on a Raspberry Pi – that server will only be visible on your local network unless you change settings on your router to make it visible world wide. If your that server is not set up correctly, then your whole network is at risk – therefore this is best left to experts. Having set up that server, you then need either a static IP address (not usually free of charge) or set up some web services (sometimes free, sometimes not), so that you can find your server when you are outside the local network.

The Nabduino board makes things a lot easier and safer than all that trouble. You simply connect an ethernet cable connected to your local network to the board, connect power to the board, and that is it. Each Nabduino board has a unique ID, and there is a simple web interface which gives you access to the board and its sensors etc accessible from anywhere in the world at XXXX.nabduino.net where XXXX is the ID of your board.

web interface for nabduino board

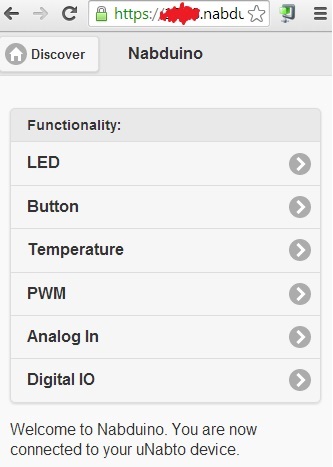
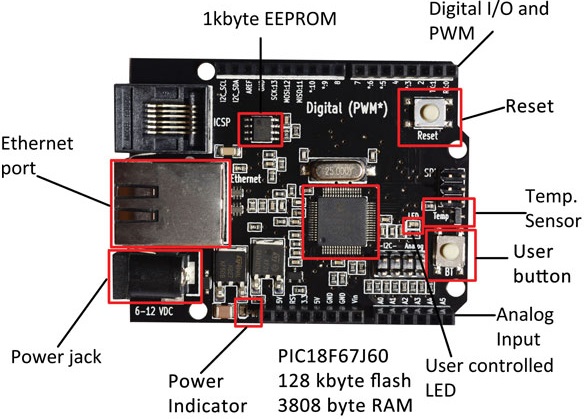
Via the simple web interface (pictured above), the state of the on board button can be viewed, an on board LED can be controlled, the temperature of the microprocessor can be monitored, five PWM outputs can be set with values from 0-255 for dimming lights or motor control, the status of six analog inputs can be viewed, and thirteen digital pins can be set to input or output and be controlled remotely.

As it stands, Nabduino could be used for simple remote control of a home via relays connected to digital outputs – for example, turning on some lights when you are away from home using your mobile phone or PC. Similarly, very basic home monitoring could be achieved with sensor switches connected to digital inputs. However, much more powerful things can be achieved connecting the Nabduino to an Arduino board so that the Arduino can respond to digital and PWM signals from the Nabduino and carry out any complex logic.

We will be looking at the Nabduino board in much more detail soon. Until then, click here to find out more about Nabto.com.
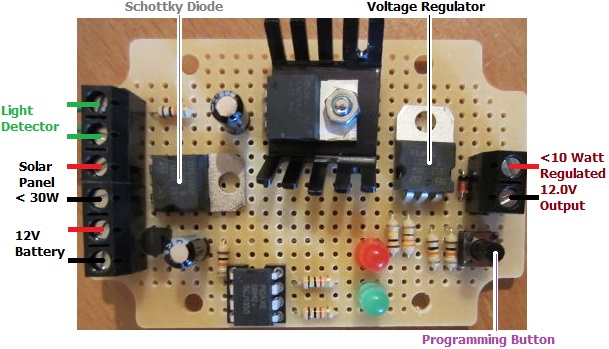
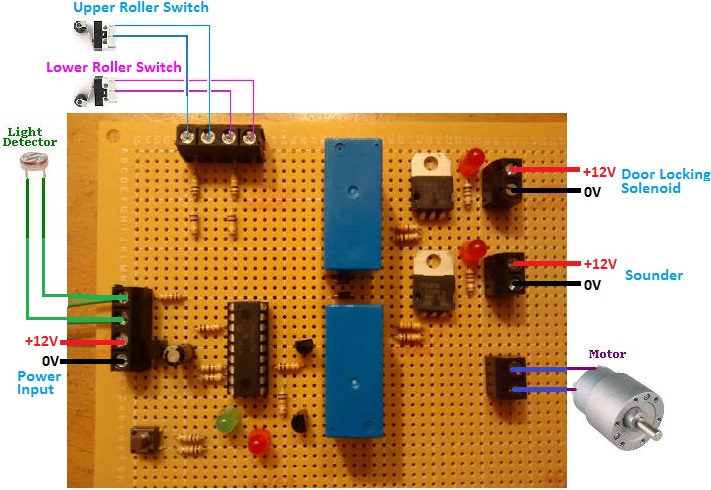
Pyboard Python for Microcontrollers

Pyboard python for microcontrollersPictured above is the Pyboard – an open source prototyping platform designed and manufactured in the UK. This board with its ARM microcontroller (STM32F405 clocked at 168MHz) is programmed using micropython a low memory usage version of the Python 3 scripting language.

The board has LEDs, microswitches, a built in accelerometer, and 30 general purpose IO connections (including 4 PWM, 14 ADC, I2C, and SPI pins) for connection to external components and analogue/digital sensors for your projects.

The board has 1MB of on board flash memory, 192KB of RAM, and also a micro SD card slot which can be used to store scripts and hold project generated data. It has a built in USB interface.

Pyboard fits in the marketplace somewhere between Raspberry Pi and Arduino. A Raspberry Pi is a full computer which means that it can be complicated to use, power hungry, and large in size. An Arduino is simple to use, has lots of useful GPIO and shields, and they are available in small versions, but they are not very fast and scripts need to be compiled on a PC before loading them to the Arduino. Pyboard is perfect for processor intensive stand alone projects – particularly for anyone who already has experience programming with Python.

Pyboard is just 33 x 40mm in size and weighs just 6g.

The official Micro Python website is here, and the tutorial which shows how to get strarted with Pyboard and Micro Python is here: Micro Python Tutorial.