Home automation and monitoring is something which many Raspberry Pi owners would like to experiment with. It potentially offers the ability to control devices such as lighting, heating, cameras, etc from anywhere in the world over the internet via a PC, tablet, or smartphone.
Unfortunately for many people there is one stumbling block – their home broadband router. When the Raspberry Pi is connected to an ethernet cable or Wi-Fi dongle it can see the internet, BUT the internet cannot see it. Even if you install a web server on a Raspberry Pi, it will only be able to serve web pages to the local network (the internet enabled devices in your home) unless you get your hands dirty changing the configuration of your router which is often difficult and sometimes not even possible.
So, you want to give home automation a go, but you cannot or do not want to become an expert in broadband router configuration – therefore you need to find an alternative way to communicate with your Raspberry Pi and give it instructions remotely.
The approach we’ll introduce in this article simply uses a small text file published on the internet. You can see the file and change its contents through your web browser on the internet; and the Raspberry Pi can download this file from the internet, read its contents, and act upon them.
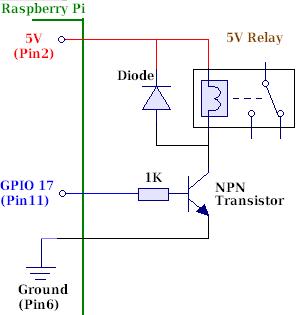
Raspberry Pi Relay Control
In the simplest case, we have one device to control (turn on or off) with a relay hooked up to the Raspberry Pi GPIO (via a transistor). When we want the relay to be closed (device on) we put “1” in the text file, and when we want the relay to be open (device off) we put “0” in the file.
The Raspberry Pi can be programmed to download and read this text file at regular intervals and can therefore change the state of the relay it controls so that is mirrors the contents of the file. Since the text file can be updated from anywhere in the world via the internet, the relay can also be controlled remotely from anywhere in the world.
(The disadvantage of this approach is that you need to have a web domain with web hosting to serve the text file to the Raspberry Pi and also the web page through which you will change the contents of that file. However, Linux web hosting with PHP programming support is available now for just £2-3 per month and web domain names from just £2 per year.)
The Webpage – PHP Script
We put together a very simple PHP script for testing this method of communicating indirectly with the Raspberry Pi. This script writes to a file called relay-status.txt storing a “1” when the user requests output ON, and a “0” when the user requests output OFF.
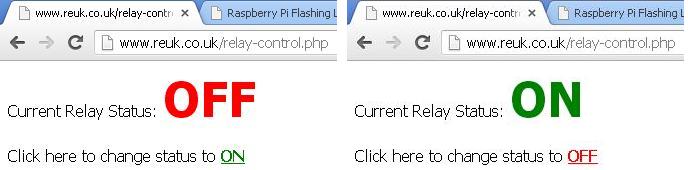
The script generates a very simple web page which shows the current status, with a link to click to change the status. You upload this relay-control.php file to your web hosting account and then view it/change the status of the relay by visiting http://www.YourDomainNameHere.com/relay-control.php through your web browser from anywhere in the world.
(The script as provided below is a simplistic proof of concept designed to be clear to understand rather than secure and robust.)
<?php
//if the relay status file does not exist then generate the file now with the default entry of 'off'
//if the file does exist then read in what it says. If the data is good (value of 0 or 1) then that is the
 //current status; otherwise we have a corrupt file contents and need to replace them with the default value 0.
$currentStatus = "0";
$filename = "relay-status.txt";
if(!file_exists($filename)){
   file_put_contents($filename, "0");
}
else{
   $contents = file_get_contents($filename);
   $contents = trim($contents);
   if($contents == "1") $currentStatus = "1";
   elseif($contents == "0") $currentStatus = "0";
   else{
      $currentStatus = "0";
      file_put_contents($filename, "0");
   }
}

//check if the user has submitted a (potentially new) value for status
//if the value is "1" or "0" then if that is different from current status, amend the file
//if the value is "1" or "0" and not different from current status, do nothing
//if the value is not "1" or "0" then the submitted data is no use.
if(isset($_GET['status'])){
   $submittedStatus = trim($_GET['status']);
   if($submittedStatus == "1"){
      if($currentStatus == "0"){
      $currentStatus = "1";
         file_put_contents($filename, "1");
      }
   }
   elseif($submittedStatus == "0"){
      if($currentStatus == "1"){
         $currentStatus = "0";
         file_put_contents($filename, "0");
      }
   }
}

//display the (maybe new) current status and a link to toggle that status
print "Current Relay Status: ";
if($currentStatus == "1") print "<font size = 8 color = green><b>ON</b></font>";
else print "<font size = 8 color = red><b>OFF</b></font>";
print "<br><br>";
print "Click here to change status to ";
if($currentStatus == "1") print "<a href = 'relay-control.php?status=0'><font color = red><b>OFF</b></font></a>";
else print "<a href = 'relay-control.php?status=1'><font color = green><b>ON</b></font></a>";
?>
The Raspberry Pi Python Script
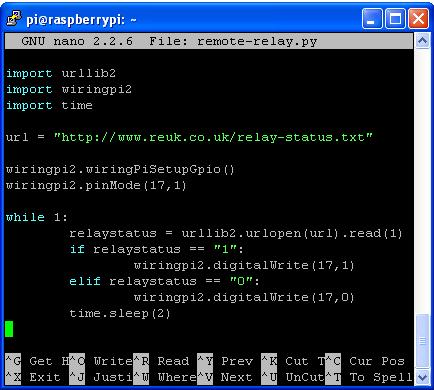
Above is the simple example Python script we used to read in the content of the file relay-status.txt from the internet every 2 seconds. The file is downloaded and the first character is read. If it is a “1” then we make GPIO 17 high, and if it is a “0” we make GPIO 17 low. (See our article Raspberry Pi Flashing LED with GPIO and Python for some background information.)
We just enter the command sudo python remote-relay.py at the prompt to run the script. To run the script as a background process so you can continue to use your Raspberry Pi while it is running enter the command sudo python remote-relay.py &. After testing, the 2 second delay should be changed to a longer interval between checks of the relay-status.txt file.