In this article you will find we made a very simple solar battery charger for 4 AA rechargeable batteries using a small 6 Volt solar panel. A labelled photograph of the completed charger is provided at the end of the article.
nb. An introduction to Solar Battery Charging can be found by clicking here.
This Solar battery charger was built back in 2006 entirely from parts then available in the REUK Shop. Since that time the availability of good quality PV solar panels and high capacity NiMH rechargeable batteries at fair prices has increased enormously, so we no longer need to sell these items. However if you have any problems sourcing the items you need from the parts list links provided below, let us know.
Here is the parts list with links to suppliers:

4 of 2500 mah – 3000 mah AA Rechargeable Batteries.
1 of 6V 200ma – 300ma PV Solar Panel.
2 of 2 AA Battery Holder with Flying Leads, or 1 of 4 AA Battery Holder with Flying Leads.
1 of Blocking Diode, or a 1N5817 Schottky Diode for lower heat losses and faster charging.
You may also need some terminal strip to join the wires together to build your charger if you do not intend to solder it together.
The Solar Battery Charger Specifications
The long life rechargeable batteries we used have a capacity of 2,700mah – therefore a charging current of 10% of this (i.e. 270ma) is safe. The nominal voltage of each battery is 1.25V, so four in series is 5.0V with a fully charged voltage of around 5.2V-5.5V being normal. Therefore our 6 Volt [charging] 250ma solar panel is perfectly rated to be used as a charger for these batteries.
In order to prevent stored power in the batteries being released through the solar panel during the night, a blocking diode is used. Placed in the postive line from the solar panel this only allows electricity to flow from the solar panel to the batteries and not from the batteries to the solar panel.
Up to 0.7 Volts from the solar panel are lost as heat in the [silicon] diode as electricity flows from the panel to the battery leaving us with a perfect charging voltage of around 5.30 Volts for the batteries. To reduce the losses in the diode and increase the charging rate, consider replacing the 1N4001 silicon diode with a 1N5817 Schottky diode (0.2V drop) or a germanium diode (0.3V drop).
Putting the Solar Battery Charger Together
To keep things simple no soldering is required to built this solar battery charger. Instead terminal strip is used to make the connections. Therefore only a small flat head screwdriver is required to secure each wire/component in place.
First of all the four batteries are put into the two battery holders and then the holders are wired together in series. To do this the positive lead from one battery holder is connected to the negative from the other. The remaining free wires – one positive and one negative – are our charging inputs. (Alternatively you can of course just use a 4 AA battery holder).
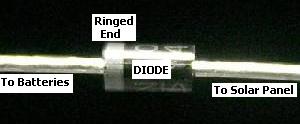
The ringed end of the blocking diode (pictured above) is then connected to the positive battery input (red), and the other end to the positive output from the solar panel (red). The negative output from the solar panel (blue) is connected directly to the negative battery input (black) .
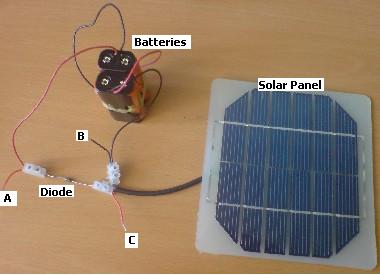
Pictured above is the completed Solar Battery Charger. The voltage measured across the points labelled B and C is the voltage coming in from the solar panel. The voltage measured across the points labelled B and A is the voltage of the batteries. (Note that during charging the battery voltage measured will be higher than the true voltage of the batteries. Cover the solar panel to measure the true battery voltage.)
A suitable multimeter is required to make these measurements.
Enhanced Solar Battery Charging
In this example the solar panel and batteries are perfectly matched; however this is not usually the case. Here are links to a couple of REUK articles which will explain how to make more advanced solar battery chargers:
1. Make a current-limited solar battery charger using an LM317T. In this article you will find out how to use a voltage regulator chip as a current limiter so that larger solar panels or higher voltage solar panels can still be used to make your battery charger – very useful if you have a 12V panel and want to charge some AA or AAA cells.
2. Find out how to make a Solar iPod Charger (or a charger for anything else using 5V USB power input) using the LM317T to regulate the voltage.
Comments
Your article about the solar charger can be improved if you suggest the builder to use either an old Germanium diode, or a more modern Schottky low voltage drop diode, instead of the silicon diode. A silicon diode has a voltage drop or around 700 millivolts, while a germanium diode will only drop around 200 millivolts… I do not remember the actual voltage drop
of the typical Schottky device, but it is surely less than 700 millivolts!My own solar charger was built using two panels from a home power tool charger… each panel produces about 3.3 volts at a current of 110 milliamps, so I put them in series connection, and use a half of an old power germanium transistor as the series reverse current protection diode… The Ni Mh rechargeable batteries take longer to charge because the smaller charging current produced by the solar panels.
Here in Cuba where sunshine is really plentiful the year round it is possible to use solar panels everywhere, but they are very expensive !!!
Prof Arnaldo Coro Antich, Cuba
July 18th 2010