Raspberry Pi 3 Model A+

Raspberry Pi 3 Model A+

Today (November 15th 2018) the new Raspberry Pi Model 3 A+ was released, four years after the release of the original Raspberry Pi Model A+.

The new A+ is a physically smaller (65mm × 56.5mm compared to 85.6mm × 56.5mm) and cheaper (US$25 compared to US$35) version of the Raspberry Pi Model 3 B+ with slightly reduced features.

The A+ has just one USB 2.0, the B+ has four. The A+ has half the LPDDR2 RAM of the B+ with 512MB compared to 1GB.  And, the A+ has no ethernet port whereas the B+ has gigabit ethernet connectivity.

The Raspberry Pi Model 3 A+ and B+ share the same 1.4GHz quad-core Arm Cortex A53 processor, and the same WiFi and Bluetooth connectivity.

Raspberry Pi Home Automation with Machinon

Pictured below is Machinon, hopefully soon to be released industrial-grade hardware originating from a community project, and designed to manage home and small business automation with a Raspberry Pi.

machinon home automation iot raspberry piThis smart home solution adds smart IO to a Raspberry Pi – 16 digital inputs, 16 digital outputs, and 8 analogue inputs.

The digital inputs can be used as pulse counters (for kWh meters etc) or to detect status changes (doors opening and closing, buttons being pressed, motion sensors triggered etc).
The analogue inputs (0 to 20mA, 4 to 20mA, and 0 to 10V input with 14bit resolution) can be used to measure currents and voltages, light levels, temperatures, and more.
The digital outputs each supply up to 500mA which can be used to switch high voltage and high current appliances via a relay, or directly power low current low voltage devices.

Machinon utilises two ATxmega microprocessors which take care of all the complex pulse counting, timing, analogue measuring, and data collection. The Raspberry Pi then simply communicates with Machinon via UART (serial port) to grab data and control and configure the smart IO.

machinon smart home prototype internals

Machinon is designed to interface with many open source home automation software packages including Domoticz, openHAB, and HomeGenie so the overall user experience should be relatively simple.

The price of this device is likely to be around £200 plus the cost of a Raspberry Pi and microSD card to go in it. Therefore, probably under £250 all in including delivery.

machinon smart home with raspberry pi

For more information, click here to visit the Machinon website.

Dual Pulse Spot Welder Timer Controller

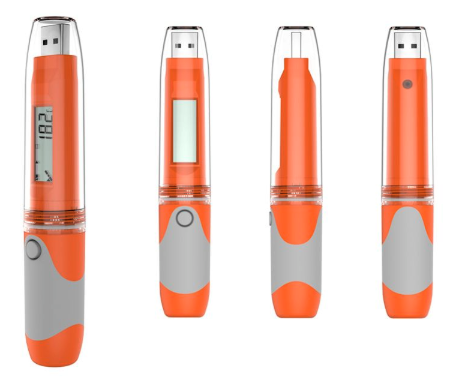
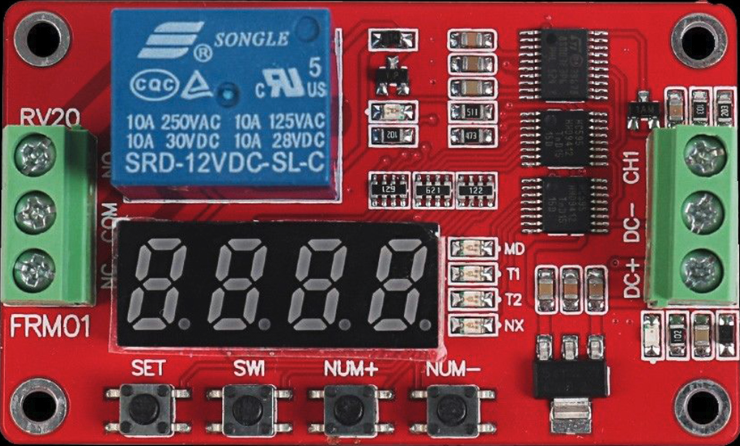
Pictured below is our popular 12VDC dual pulse spot welder timer controller which we designed, build, and sell.dual pulse spot welder controller

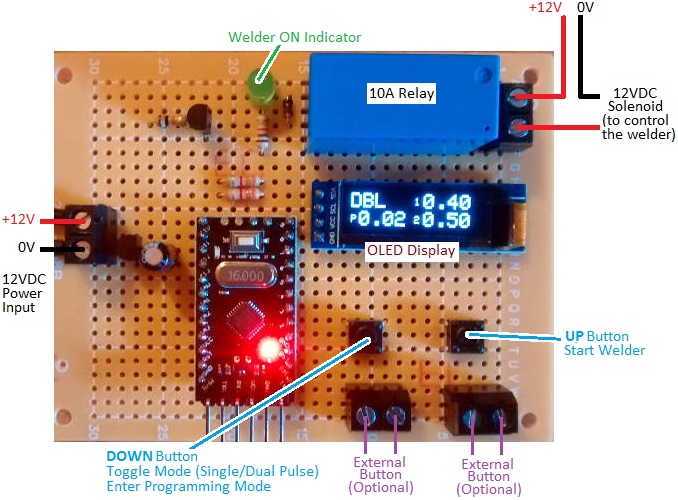
Spot welding (resistance spot welding – RSW) is used to join metal surfaces by passing a large electric current through them. Because of the heat generated by the resistance to the electric current, the contacting metals melt together forming a weld at the spot through which the current is passing.

In order to get good clean reliable welds and not to burn holes through the metal, it is essential that the pulse of electric current is of a suitable duration which depends on the types and thicknesses of the metals to be welded as well as many other factors. Therefore an accurate timer controller is required for consistent welds.

For the best spot welds, a dual pulse controller is used in which the electric current flows for a time (pre-weld), then there is a brief pause, and then electric current flows again (welding). The first pulse clears away any plating or surface oxidation, and then the second pulse welds the now clean base materials together. Using a dual pulse welder also reduces spitting.

REUK Dual Pulse Spot Welder Controller

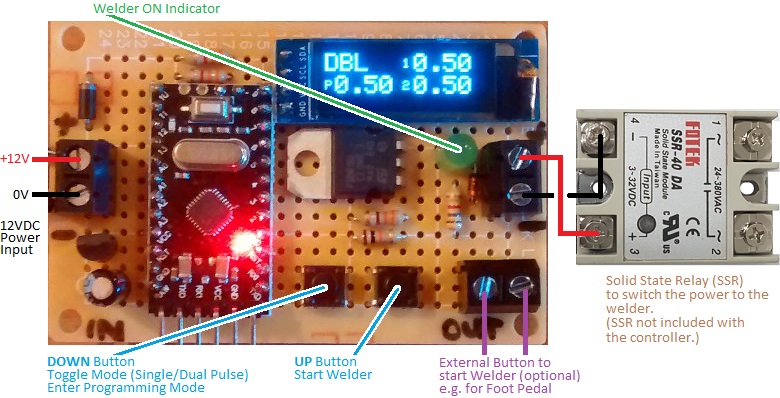
Our controller offers two modes of operation: single pulse mode and dual/double pulse mode. Pictured below is a view of the built in OLED display when in dual pulse mode.

dual pulse spot welder display

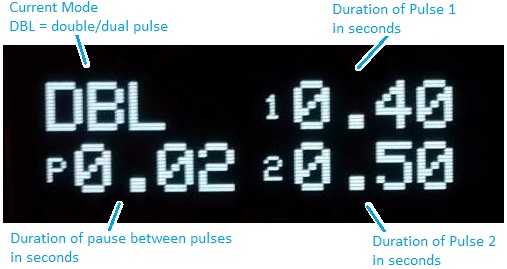
The user can set the durations of Pulse 1, the pause time, and Pulse 2 in 0.01 second steps between 0.01 and 1.99 seconds.

single pulse operation of spot welder

In single pulse mode, the duration of just one pulse has to be set by the user. (A future update of this device will probably include up to 10 user-programmable presets for increased convenience.)

setting spot welder pulse duration

On board buttons are provided for toggling between the single and double pulse modes, entering programming mode to set the timings, and making a spot weld with the displayed settings. Screw in terminals are provided so that external buttons can be connected – for example a foot pedal to make a weld with your hands free.

This version of the welder controller is fitted with a 10A relay which can be used to power a < 5A rated solenoid which in turn switches the welder.

Buy a Welder Timer Controller for Your Relay

For any type of welder timer controller, please email neil@reuk.co.uk with details of any special requirements. Our controller as described above is available at £21.95 plus postage.

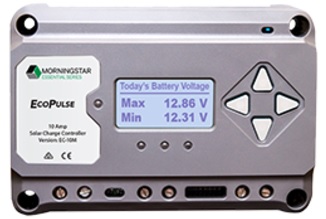
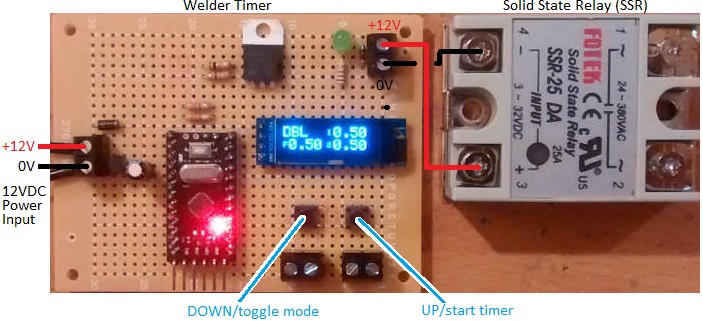
If you require a timer which will be switching more than 10 Amps of current for your welding setup, then we also make the alternative devices pictured below which have a 1 Amp 12V output for connection to your own solid state relay (SSR) or mechanical relay. These are available for £19.95 plus postage – no relay included. Click here for a source of solid state relays.

reuk dual pulse welder timer controller for solid state relay

dual pulse welder timer with solid state relay (ssr)

If you require a bespoke device which pulses the welder with very brief times and higher time resolution – e.g. 0.001s – 1.999s instead of 0.01-1.99s – we can modify the above photographed timer controller…but only for use with a solid state relay (since SSRs can switch in 1ms (0.001s) rather than the 10’s of milliseconds it can potentially take a mechanical relay to switch). Contact us with details of your specific requirements for a quotation.

Dual Pulse Spot Welder Timer Instructions

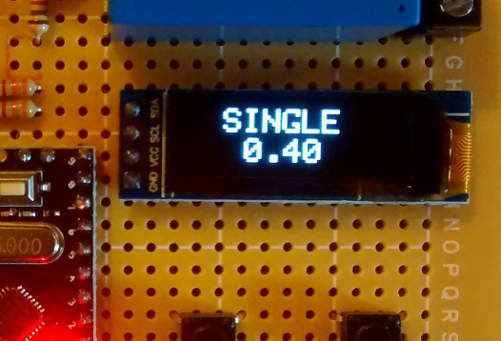
There are two buttons on the controller. If you press the ‘down’ button, you can toggle between single pulse and dual/double pulse operation. The display will change to show which mode you are in: SINGLE or DBL (double) as well as showing the durations currently programmed into the device.

If you press and hold the down button for more than one second, the display will show SET TIMERS. If you are in single pulse mode, you can now set the single pulse duration. If you are in double pulse mode you can now set the durations of pulse 1, the pause time, and pulse 2. The top line of the display will show what is currently being programmed (Time 1, Pause Time, or Time 2), and the bottom line will show the current value. Use the up and down buttons to increase or decrease the displayed value (within the range 0.01s to 0.99s). Five seconds after you last touched a button, the top line of the display will show -SAVED- and the value will be saved in long term memory (still available the next time you power on the controller). If you are in double pulse mode, you will now be asked to set the pause time and the duration of the second pulse in exactly the same way that Time 1 was set. (When using the up and down buttons to increase or decrease a time value, you can press and hold the button to move faster through the numbers.)

If you press the up button, the controller will run. The relay will close for the duration of Time 1 and then open again. If you are in double pulse mode, it will then remain open for the duration of Pause Time and then close for the duration of Time 2.

In addition to the buttons on the controller board itself, screw in terminals are provided to which you can connect external buttons of your choosing – e.g. a foot pedal operated button, or a larger hand operated button etc for your own convenience.

enviro:bit sensor for micro:bit

enviro:bit from pimoroni for micro:bitPictured above is the new enviro:bit for micro:bit from Pimoroni – available for £20. This device has a collection of sensors which can add be read easily from  Microsoft MakeCode Editor or directly via MicroPython for more advanced projects and programmers.

There are three sensors in total. A BME280 atmospheric sensor which provides temperature, humidity, and air pressure measurements, a TCS3472 colour and light sensor, and a MEMS microphone for sound.

micro:bit plugged into enviro:bit to use sensors

The micro:bit simply plugs into the enviro:bit, and once you have added the required code library or libraries (for MakeCode Editor and/or Mu Code Editor) the sensors can be read, data collected, and displayed on the LED matrix etc.

Click here for more information: buy enviro:bit from Pimoroni.

FRM01 Multifunction PLC Relay Timer Module

Pictured below is an FRM01 multi-function relay cycle timer PLC (programmable logic controller) module. FRM01 12V multifunction PLC relay timer

This small (65 x 40 mm) module offers 18 different timer functions programmable from 0.1 seconds to approximately 275 hours and used to control the on-board 10A rated relay. Some functions start automatically with power-on, others can be triggered to start (and/or repeat) with a high level pulse signal; there are delay functions, limited cycles (1-9999 repeats), and unlimited cycles.

One of the functions effectively turns this module into a latching relay board too – high pulse signal to close the relay, then another high pulse signal to open the relay.

Overall these modules are very powerful and useful in a vast range of applications requiring timer control.

Click here to buy FRM01 Timer for approximately £5 including delivery.

eBay sellers tend to offer no documentation and minimal information about these timer modules, but we have the comprehensive 8 page FRM01 User Manual (PDF 225Kb) available for download here.

Here is a video systematically demonstrating all 18 of the functions of this cycle timer

Morningstar EcoPulse PWM Solar Charge Controllers

Pictured below is one of the new range of EcoPulse solar charge controllers from Morningstar Corp (makers of the ever popular SunGuard Solar Controller). EcoPulse controllers are a part of the new Essential Series™ of consumer rated products designed for residential and off-grid use including the leisure market.morningstar ecopulse metered version

There are six different versions of the EcoPulse: 10A, 20A, and 30A rated with an interactive meter display as pictured above (EC-10M, EC-20M, and EC-30M), and 10A, 20A, and 30A rated with no display (EC-10, EC-20, and EC-30M) as pictured below.morningstar ecopulse non-metered version

EcoPulse controllers are designed for 12V and 24V solar systems with DIP switches used to select either 12V, 24V, or auto-detection.

These controllers are suitable for marine use as they are rated up to 100% humidity, the electronics have a protective conformal coating, and all connection terminals are corrosion resistant. The case is made from durable polycarbonate, and passive cooling is provided by an aluminium heatsink.morningstar ecopulse charging algorithmEcoPulse controllers have a 4-stage PWM battery charging algorithm – bulk charge, absorption, and float, with equalization available (automatic or disabled on non-metered models, manual or automatic on the metered models). The PWM frequency is 300Hz by default, but can be set to 1Hz if there is a problem with system noise.

EcoPulse has a built in adjustable dusk ‘til dawn lighting controller with the solar array being used as the ambient light detector.  (See our article Solar Panel as Darkness Detector for a simplified version of this technique.) A built in low voltage disconnect prevents the battery from being overly depleted by connected loads.

ecopulse pwm solar charge controller connection diagramEcoPulse has a built in sensor for temperature compensation, but an optional remote temperature sensor is also available if the controller is to be positioned more than 3 metres from the battery bank. There is also protection against short circuit, over current, and high voltage etc with fault indications displayed with coloured LEDs.

To find out more about EcoPulse, click here for the official Morningstar EcoPulse page where you will find links to the full operation manual and datasheet for the EcoPulse range.

The MSRP for the products in US Dollars are as follows and they are sold with a two-year manufacturers warranty:

  • EC-10 $65 EC-10M $101
  • EC-20 $78 EC-20M $129
  • EC-30 $104 EC-30M $156

μduino Smallest Arduino Compatible Board – ATMEGA32U4

Pictured below are photographs of the top and bottom of prototypes of the new μduino, an Arduino-compatible board with dimensions of just 12x12mm making it probably the smallest Arduino every built – just a little bigger than a microSD card.

uduino smallest arduino compatible board

The μduino is smaller in size than the Digispark (with its ATTiny85 chip and 6 I/O pins), but uses the same ATMEGA32U4 microcontroller found on the much more powerful Arduino Leonardo offering 20 I/O pins including 6 analog and 14 digital I/O ports, 7 PWM channels, and a lot more memory.

μduino is now (early August 2017) fully funded on Crowd Supply (a crowd funding website similar to Kickstarter and Indiegogo), easily reaching and exceeding its funding goal with 11 days to spare.

μduino can be set up to operate at either 3.3V or 5V depending on the requirements of your project and any connected sensors.

The tiny size of µduino was achieved using a smaller hole separation (1.27mm vs 2.54mm) relative to standard boards, and packing the components tightly together on both sides of the board.

For full details and/or to place an order for a µduino @ US$18 (shipping on or after September 20th 2017), click here for µduino on the CrowdSupply.com website.

μduino Specs

ATMEGA32U4 microcontroller
6x Analog I/O ports
14x Digital I/O ports (including Rx/Tx)
Status LED
Dual-power modes for 3.3V and 5V operation (accepts up to 16V)
1x Power output (3.3V or 5V depending on what mode is selected)
3x Ground ports
1x Analog reference voltage port
Reset button
16 MHz precision crystal oscillator
MicroUSB port for easy programming and prototyping

Solar Water Heating Pump Controller – East West Aspect Collectors

Pictured below is a solar water heating pump controller which we recently made for use within a system which has two solar collectors – one on an East-facing roof and one on a West-facing roof.

solar water heating pump controller for use within a system with east and west facing solar collectors

We have previously made an East West Solar Water Heating Pump Controller for use in a more complex system which controlled valves which were used to select whether to take solar heated water from the East or from the West-facing collector. The above pictured controller however is just based around our 2014 Solar Water Heating Pump Controller, with the additional of a third sensor and a modified display output.

display for east west solar water heating pump controller

The standard 2014 controller will turn on the pump when the solar collector is a user programmed number of degrees hotter than the tank or pool to be heated. Our modified East/West version instead runs the pump whenever either the East or West-facing collector is that user programmed number of degrees hotter than the tank or pool.

The water in the system is pumped from the tank or pool, up through both solar collectors in turn, and back again in a loop. Therefore, this simpler version has the disadvantage that water from the hotter collector (or from the tank/pool) may cool a little in the colder collector as heated water flows through it. However, overall the system is pretty efficient considering the disadvantage of having to face collectors to the East and West instead of to the more optimal South (in the Northern Hemisphere) due to the orientation of the building.

If you need any kind of solar water heating pump controller, please email neil@reuk.co.uk with details of your requirements.

Replacing 30 Year Old Solar Hot Water Controller

Pictured below is the differential temperature controller fitted to a 1980’s solar hot water system. After many years of successful operation, this controller finally failed (pump stays on all the time) and needed to be replaced.

Old solar water heating pump controllerSomething functionally identical was required, at least externally for the benefit of the user, so we were tasked to build a differential controller with relay to switch a mains powered pump, and to include a power on LED indicator, a pump on LED indicator, and a physical switch to select between standard automatic operation and ‘override’ which forces the pump to run.

Circuitry found in 1980's differential temperature pump controller

The internals of the old controller are pictured above. It shows a simple system with mains power going in and coming out again on its way to the pump switched by a relay, a transformer to get low voltage DC from the incoming mains AC, a potentiometer which is probably there for the installer to set the temperature differential required between solar panel and hot water tank for the pump to be turned on or to zero the measured difference when the sensors are at the same temperature, and the connections (two core) for two temperature sensors which are almost certainly going to be thermistor type sensors. There is also an IC visible which will most likely is a microcontroller, a 555 timer, or a comparator.

The sensor leads (and all other leads) were soldered in place upon installation, and the sensor cables were run through walls and are therefore inaccessible. Since the existing cables were 2-core, we had to build the new controller using sensors with two connections – LM335 – rather than the 3 connection digital sensors we use in most of our controllers – DS18B20 temperature sensors.

Our 2013 Solar Water Heating Pump Controller is the most similar unit we sell to this existing controller, so used that as the foundation of the controller we built.

modified 2013 solar water heating pump controllerAll LEDs, buttons, and switches have to be external to the controller board, so these have extended leads which connect via screw in terminals. We supplied a plug in 12VDC power supply rather than fitting a transformer directly to the circuit board, and we added an LED which turns on when the unit is powered, and the override switch which can be used to force the pump to run. We fitted the programming button (used to set the temperature differentials at which the pump turns on and turns off) to the circuit board, but connected terminals in parallel with it so that an external button can be panel mounted now or at a later date.

If you need a modified version of one of our differential temperature controllers, please email neil@reuk.co.uk with details of your requirements.