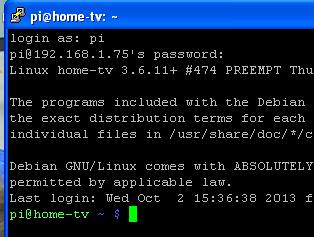
Since we published some introductory articles on the Raspberry Pi we have had some emails from REUK site visitors who saw in the screen grab images we used to illustrate the articles that we had changed the [host] names of our Raspberry Pi’s from the default raspberrypi to more useful identifiers such as reuk-office, research, home-tv, and home-attic etc.
If you have more than one Raspberry Pi then it makes things a lot easier (or to be more accurate, it makes it more difficult to accidentally modify or delete files on the wrong Pi!) if each has a unique name. It also prevents any conflicts when each has its own name.
If your Raspberry Pi is connected to a keyboard and TV/monitor, bring up the command prompt, otherwise follow our instructions to: Connect to Raspberry Pi via SSH from another computer on the network, and log in.
First we need to edit the /etc/hosts file. Type at the command prompt:
sudo nano /etc/hosts
and press enter.
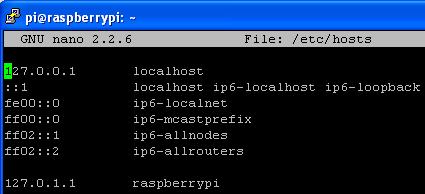
Use the arrow keys to move down to the last line of this file and replace raspberrypi with your chosen name. Then press Ctrl-x, then y, then enter to save the change.
Next we need to edit the /etc/hostname file. Type at the command prompt:
sudo nano /etc/hostname
and press enter.
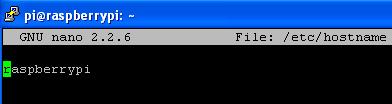
Replace raspberrypi which is the single line contents of this file with your chosen name. Then again press Ctrl-x, then y, then enter to save the change.
Finally type sudo reboot at the command prompt to reboot your Raspberry Pi. When it restarts, you should see that your command prompt has changed to reflect the changes you have made.