In our article DS18B20 Temperature Sensor with Raspberry Pi we showed how to measure the temperature of something with a DS18B20 digital temperature sensor connected to the GPIO pins of a Raspberry Pi. In this article we will take things one step further, automatically publishing the temperature at regular intervals to Twitter so that they can be viewed from anywhere in the world.
In order to achieve this we need create a new Twitter account (assuming you do not want to publish temperature readings to an existing Twitter account), create a Twitter application via Twitter Application Management, and add a new Python package called tweepy which enables your Raspberry Pi (or other Linux computer) to Tweet.
Setting up the Twitter Application
First go to Twitter.com and create your account. Next click here to go to Twitter Application Management, and click to Create New App.
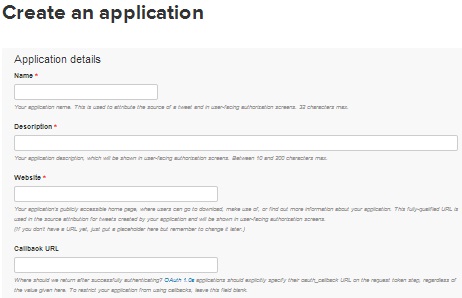
You need to choose a name for your application, and fill in a brief description of what it does. Then you need to fill in the website associated with the application. If you do not have a website, then type anything here as a placeholder. Lastly you can fill in a callback URL, but this can just be left blank. After agreeing to the terms and conditions, click the button to Create Your Twitter Application.

By default, your new application can only read tweets. You need to modify the permissions to enable tweets to be written. Click modify app permissions and then select Read and Write from the displayed options. Click on Update Settings to save the changes.
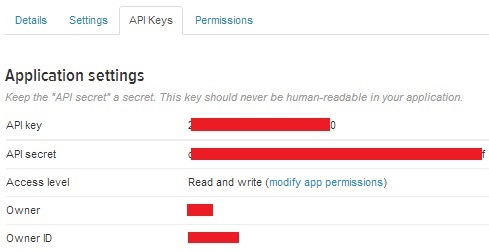
Now click on API Keys. Your API key and API secret tokens will be displayed as well as some other information. Scroll down and click on the Create my access token. After a few seconds (you may need to refresh your browser), these tokens will also be displayed.
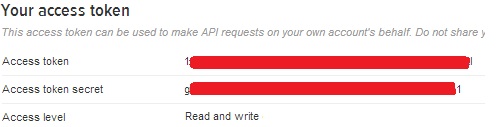
So, you now have the four tokens required to enable the Python script you will write on your Raspberry Pi to send tweets to your new Twitter account – API key, API secret, Access token, and Access token secret.
Raspberry Pi – Python, and Twitter
Next follow the instructions in our previously mentioned DS18B20 with Raspberry Pi article and get things set up so that you are reading in and displaying temperatures successfully with your Raspberry Pi.
If you have not done so recently, do the sudo apt-get update and sudo apt-get upgradecommands on your Raspberry Pi to make sure everything is up to date. Next enter the following commands to add the Python package tweepy.
sudo apt-get install python-setuptools
sudo easy_install pip
sudo pip install tweepy
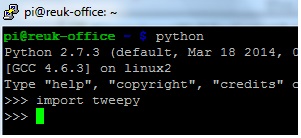
In order to test that everything is working as it should, type python at the command prompt. Then when Python runs, type import tweepy. If that does not lead to any error messages, then the tweepy Python package has been successfully installed. (enter exit() to quit Python.)
With that installed and working as it should, we can now write the Python script which will read in the temperature from our DS18B20 sensor and send it to Twitter (in my case I used the text editor nano with the following command: nano REUK-Tweet.py to create a Python file called REUK-Tweet.py.
#! /usr/bin/env python
import tweepy
from datetime import datetime

API_KEY = 'YOUR API KEY'
API_SECRET = 'YOUR API SECRET'
ACCESS_TOKEN = 'YOUR ACCESS TOKEN'
ACCESS_TOKEN_SECRET = 'YOUR ACCESS TOKEN SECRET'

auth = tweepy.OAuthHandler(API_KEY, API_SECRET)
auth.set_access_token(ACCESS_TOKEN, ACCESS_TOKEN_SECRET)
api = tweepy.API(auth)

tempfile = open("/sys/bus/w1/devices/28-00000XXXXXX/w1_slave")
thetext = tempfile.read()
tempfile.close()
tempdata = thetext.split("\n")[1].split(" ")[9]
temperature = float(tempdata[2:])
temperature = str(temperature / 1000)

thetime = datetime.now().strftime('%-I:%M%P on %d-%m-%Y')

api.update_status(temperature + " C at " + thetime)
Save the script and now we can test that everything is working as it should. Enter the command:
sudo python REUK-Tweet.py
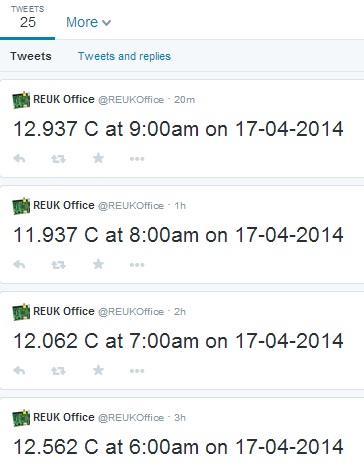
wait a second, and if no error messages are displayed go to your Twitter account online, refresh the page, and the temperature of your sensor should be displayed with the time and date that the reading was taken.
Note that in the first version we wrote of this script, we did not include the date and time, but if the exact same tweet is send twice in a row, the second tweet is ignored by Twitter as a duplicate. Therefore by adding the time to each tweet, even if the temperature has not changed since the previous reading, the tweets will be different and both will be added to your Twitter account.
Finally we need to automate this whole process so that the temperature of our sensor will be sent to Twitter at regular intervals. The easiest way to achieve this is with cron, a software utility included with all linux distributions which will automatically run jobs at certain times of day or at certain time intervals.
At the command prompt enter:
sudo crontab -e
Scroll down to the bottom of the cron file and enter the following after the last line and save the file:
*/60 * * * * python /home/pi/REUK-Tweet.py
This will automatically run the temperature reading Python script REUK-Tweet.py on the hour every hour. If the location of your script is not in the /home/pi directory, then modify above; similarly, replace REUK-Tweet.py with the name of your Python script if your file name is different. (Here is a link to an excellent Introduction to Cron if you are interested in finding out more about using cron to schedule this or other scripts to run automatically).
Here is a the twitter feed for hourly temperature sensor readings from the REUK workshop: REUK Workshop Temperature Monitor.
Other Uses of Raspberry Pi and Twitter
Now you have got this script up and running with your Twitter account and you know how to create a Twitter application, there are so many things you can do with your Raspberry Pi taking in readings from any of a huge range of digital sensors, buttons, and switches, and even analogue inputs (see Analogue Inputs with Raspberry Pi) such as light levels and voltages. With the results sent to Twitter, you can monitor them from anywhere in the world.