Pictured below is one of our standard programmable 12V low voltage disconnect (LVD) circuits which has been modified for 24V battery systems.
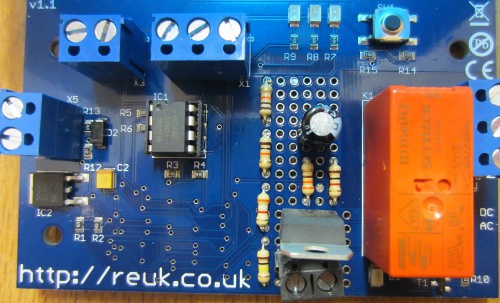
The base circuit board used is one we designed and have made for us which is a multi-use board with a high quality matching enclosure. By soldering a few jumper links on the back of the board we can change its functionality, inputs, and outputs so that it meets the requirements of whatever project we are working on. We designed the board with a small prototyping area in the middle to which additional components can be added if required.
In order to use this board for a 24 Volt low voltage disconnect things were a little tricky as all on board components are designed for 12 Volts. Therefore we first added an LM317T voltage regulator (using R1=330R, R2=2K8 resistor) and screw in terminals for the 24V battery to be connected to. The 11.8V outputted from the regulator was then connected on the underside of the board to the usual 12V input terminals which are now not used.
We then added a voltage divider to reduce the approx 24V input voltage sufficiently so that it can be measured using the analog to digital converter (ADC) on the PICAXE-08M2 microcontroller – we needed less than 5V across the full range of input voltages from the 24V system (e.g. up to at least 30V), and wanted to set this up so that the digital value given when 24.00V is connected to this new LVD is the same as that given when 12.00V is connected to the standard LVD.
The ADC converts the voltage it is seeing into a 10-bit digital value from 0-1023 where 0 will be the value if the voltage is zero, and 1023 will be the value if the voltage is equal to the supply voltage of the microcontroller (5.00V in this case).
With the accurate 470K/100K voltage divider we use on the standard 12V LVD we get 35.922 per Volt – i.e. input 12.00V to the circuit, the voltage divider will reduce this before it gets to the ADC (to 2.553V) and the ADC will output 12.00*35.922 = 431. We have hard-coded the 35.922 multiplication factor into our 12V LVD and everything else is worked out from it.
We hand-calibrated the new voltage divider (because the resistors we used in it only have a 10% tolerance). We simply inputted a 24.00V voltage and measured the voltage seen on the ADC pin with an accurate multimeter. DIviding this voltage by 5.00V and multiplying by 1023 to get the ADC value we got 398, less than the 431 it would have been if the resistors were high tolerance. Dividing 398 by 12V we found that the multiplication factor for our 24V LVD was 33.135 per Volt, so we simply changed that one value in the microcontroller code and everything worked perfectly – the only difference is that the user can set the cut in and cut out voltages in 0.2V steps now instead of 0.1V steps.