Maglite torches are excellent. They are well manufactured and durable, stylish and functional. However, they are limited by the batteries your use, and the lifetime of the bulbs. If only it was possible to change the standard Maglite incandescent tungsten bulb for an LED the batteries would last many times longer, and with a lifetime of 100,000 hours+, you can forget about your bulb dying every few battery changes.
Finally Maglite are in the process of creating MAG-LED Technology with the intention of incorporating an LED into a Maglite torch, but what about your old Maglite torches? Fortunately it is a simple modification to replace the standard incandescent bulb for an ultra-bright white LED. The torch will not be quite as bright as it was before, but the increased reliability is well worth that loss. The best torch to modify is a standard 2 AA battery MiniMaglite®. Lighting up an ultra-bright white LED with the 3 volts from 2 AA batteries will give you a very dull torch with batteries that will last for weeks. However, for maximum brightness it is necessary to replace the 2 AA batteries with 3 N sized batteries (best priced at UKbattery.co.uk in the UK.)
3 N cells in series provides 4.5 volts, but white LEDs require 3.6 volts, therefore a 15 Ohm resistor is required to limit the current to 30mA. Using a lower rated resistor is possible, but the current will increase leading to an emormous shortening of the lifetime of the LED (down to tens or hundreds of hours from hundreds of thoudands of hours at rated current).
As 3 N cells are shorter in length than 2 AA cells, it is necessary to create a spacer. Take a piece of wooden dowling the same or similar diameter to an AA battery. Then drill a 3mm hole through the middle from end to end. Get two wide headed nails, nip off all but 5mm of the length of each nail (or use a drawing pin if you prefer). Wind one of the legs of the resistor around the first nail. Put the nail and resistor into the hole you have drilled in the dowling rod and then epoxy or super glue the nail in place. When that is dry you can wind the other leg of the resistor around the second nipped nail and glue that nail in place too.
If you have 1.2V rechargeable NiCad or NiMH N-sized cells, then three of those in series with a solid metal (or wood wrapped in aluminium foil) spacer will give you the 3.6V required. At full charge the current through the LED will be over the rated value, but as the batteries use up some charge the current will fall back down to <30mA as required for long LED lifetime.
The LED itself just needs to have its legs trimmed to around 5mm and pushed in where the bulb previously lived. Then increase the size of the hole in the reflector so that the LED will fit through, and that’s it. Your homemade LED maglite is ready for action.
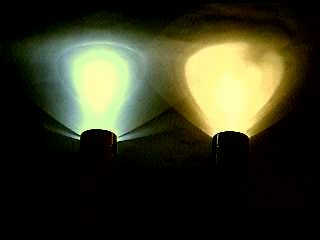
Below is an image which shows a comparison between the LED bulb Maglite (left) and the standard incandescent bulb (right).
For further information take a look at the following excellent web guides:
White LED Flashlight Conversions
DIY LED Flashlight
Carter LED Flashlight Conversion – Sell conversion kits with everything you need to DIY.
also, it is possible to purchase commercial retrofit upgrades for Maglite torches, for example, The Torch Shop sells a 3-LED conversion kit for the MiniMaglite for £15. LED-Replacement in the USA sell upgrade kits for all sizes of Maglite torch.