User programmable 12VDC powered 16A rated repeating relay timer. 1 second to 99 hours ON and OFF times
(1-5: £23.99 each, 5+: £23.49 each)
OUT OF STOCK
Additional Information
After the great success of our REUK Super Timer over the last couple of years, we are pleased to now be able to offer our improved Autumn 2011 Mark 2 version, the REUK Super Timer 2.
As with the original timer – the REUK Super Timer 2 is a 12VDC powered repeating timer with user-programmable ON and OFF durations designed to control a huge array of different items including irrigation systems, aquarium pumps, battery chargers, testing systems, heating and cooling systems, feeders, and much more. It can be programmed with ON and OFF durations of 1-99 seconds, 1-99 minutes, or 1-99 hours. The ON and OFF durations do not have to have the same values or even the same units – e.g. it is possible to have a timer which is on for say 3 seconds and then off for 7 hours etc, or any other combination.
The REUK Super Timer 2 improves upon the original Super Timer in that:
* it is supplied with a high quality IP54 rated translucent ABS plastic box with screw fitting lid
* it comes with a larger (but lower power consuming) 16A rated relay for switching low voltages AND mains electricity
* in addition to the circuit board mounted programming button, screw in terminals are included for the parallel connection of an external (e.g. panel mounted) push-to-make button for programming – particularly useful for mains switching applications.
Is this the Timer for You?
For most repeat relay timer applications the new REUK Super Timer 2 will be suitable – however, as with the original Super Timer if you require a timer which can be programmed with an ON duration of say exactly two and a half minutes, this is still not the product for you (since you could set the ON time to be 2 minutes or 3 minutes, but not 2 1/2 minutes).
If our REUK Super Timers do not meet your needs, please contact neil@reuk.co.uk with details of your exact requirements and we are usually able to put together a bespoke timer for you for around the same price.
REUK Super Timer 2 Connection Diagram

Pictured above is the connection diagram for the REUK Super Timer 2. Take particular care to ensure that the 12VDC power supply or battery is connected with the correct polarity. The connection diagram shows only how low voltage (<30V) can be switched – for mains switching applications read on for more information.
Powering the Timer
The REUK Super Timer 2 is designed to be powered by 12VDC from either a battery (solar charged or otherwise) or a 12VDC mains transformer – available here: 12VDC 500mA Power Supply.
It is possible to power the timer safely with an input voltage of approximately 10-16VDC. Below 10VDC the relay switch will not close and so the timer will not do anything; above 16VDC the relay and other components on the circuit board could be permanently damaged.
During OFF cycles the timer draws no more than a couple of milliAmps, and during ON cycles it draws around 40mA (= 0.5 Watts @ 12VDC).
Switching Devices with the Relay
The relay fitted to this circuit is rated to switch up to 16 Amps (16A @ <250 VAC or 16A @ <30 VDC). If you intend to switch a higher voltage e.g. mains electricity, then we accept your purchase of this item only on the condition that a qualified person makes the necessary connections and checks over the installed system to confirm that everything is correctly earthed and insulated etc to meet with local safety regulations. If from the connection diagram above you or your electrician cannot work out how to use this device to switch mains electricity then find someone who does!
Although the rating of the relay is 16 Amps, if you intend to switch an inductive load (anything which generates a magnetic field – e.g. a motor, pump, solenoid, relay etc), the REUK Super Timer 2 should not be used to switch anything rated at more than around 6 Amps since at start up a surge current in excess of the 16A rating could damage the relay and circuit board. Check the fuse rating of your inductive load device to get an idea of the actual maximum peak current likely for a good indication of whether this 16A relay can be used.
The REUK Super Timer 2 can of course be used to switch a large slave relay (for example an automotive relay for 12VDC applications up to around 40A) which will in turn switch the high current rated device(s).
The Box
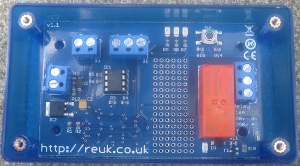
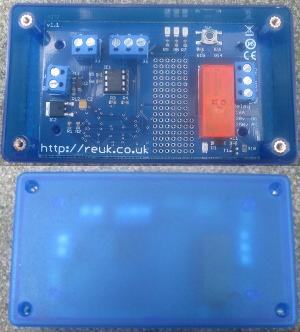
We have chosen a very high quality enclosure for this timer – from Hammond Manufacturing Co. Ltd. of Canada. With the lid screwed on (screws provided) the box is rated at IP54 which means that it is both dust proof and splash proof. It is made from strong ABS plastic and has a translucent satin finish through which the LEDs on the timer circuit board can be clearly seen when they light up. The dimensions of the box are 113 x 63 x 31mm. The Super Timer 2 is shown mounted in its box below (first without, and then with its lid).
If you plan to fit the lid to the box, then you will need to drill holes through the side of the box in order to feed in the connecting cables. It is very quick and easy with a standard HSS drill bit. We do not pre-drill the holes since everybody has different requirements for cable diameters and which side(s) of the enclosure they are to enter the box.
If you would prefer to use your own enclosure, or feel that you do not need the provided enclosure, we can sell the REUK Super Timer 2 circuit board alone for £19.99. In that case, email neil@reuk.co.uk with details of your desired order quantity and we will invoice you accordingly.
If you would like to receive this timer pre-fitted with the button in the lid and with the holes pre-drilled in the enclosure for the power input and relay connections then email neil@reuk.co.uk.
Fitting an External Programming Button
If you plan to seal the timer into its box – particularly for mains electricity switching applications or if the timer is to be used and programmed in a hostile environment – it is possible to use an external button (for timer programming) connected to the circuit board as shown in the connection diagram via the provided screw in terminals.

We suggest you use a small (low profile) panel mountable push to make button, and fit it into the lid of the provided enclosure. We recommend the button pictured above which we can supply for £1.45 if you contact us directly. We have found this button to be very reliable and easy to fit. It requires a 12.7mm hole to be made in the lid (though 13mm is absolutely fine if that is the drill bit you have).
If you do not want to use an external button, then make sure that mains power is not connected to the relay when using the on circuit board button. It only takes a moment to remove the lid and re-programme the timer anyway!
Instructions for Programming the Timer
The instructions for programming the REUK Super Timer 2 are the same as those for the original Super Timer and are provided below:
For the first 10 seconds after the circuit is connected to the power the yellow LED will be lit. During this time it is possible to re-programme the ON and OFF durations of the relay. Press the programming button once and the yellow LED will turn off. This confirms that you have entered programming mode.
For the ON and OFF durations you must enter first the timing units (hours, minutes, or seconds), and the two digit number of those units – e.g. 03 or 47 (from the range 01 to 99).
Programming entails entering six numbers in the following order:
1) ON duration time units: 0 = hours, 1 = minutes, 2 = seconds
2) ON tens: e.g for a 43 second ON time, this value would be 4 (since 4 x 10 = 40). For a 1-9 second duration this value is 0 – e.g. 01, 02, 03,…09
3) ON ones: e.g. for a 43 second ON time, this value would be 3
4) OFF duration time units: -as above-
5) OFF tens: -as above-
6) OFF ones: -as above-
To enter each value in turn, the technique is described below:
The red LED will light up for 2 seconds. If you want to enter a ‘0’ then press the button while the red LED is on. When the red LED turns off, the green LED will start flashing – on for 1.5 seconds, then off for 0.5 seconds. If you want to enter a ‘1’ then press the button while the green LED is lit for the first time. To enter a ‘2’, wait until the green LED turns on for the second time and press the button. To enter a ‘3’ press the button the third time the green LED lights up…and so on.
When you press the button the green LED (or red LED if you are entering a ‘0’) will immediately turn off, and the yellow LED will light up and stay on for one second. This gives you visual confirmation that your input has been accepted and tells you to get ready to enter the next value. When the yellow LED turns off and the red LED lights up again repeat as above to enter the next value.
If you make a mistake while programming, just disconnect the circuit briefly from the power and start again. It is much easier to programme the timer if you prepare yourself beforehand by working out and writing down the six values in order so that you are ready to enter them.
For example, if you want a timer which will be ON for 7 seconds and then OFF for 23 minutes, the ON timer units are seconds (‘2’), and the OFF timer units are minutes (‘1’). Therefore you would need to enter the following sequence of values:
‘2’ (seconds – second green LED), ‘0’ (no tens- red LED), ‘7’ (7 ones – seventh green LED), ‘1’ (minutes – first green LED), ‘2’ (2 tens – second green LED), ‘3’ (3 ones – third green LED). So, you would write down
before you programme the timer – note that ‘red’ is written rather than ‘0’ so you remember to press the button when the red LED is on.
If you enter a number greater than 9 for the tens or ones, ‘9’ will be saved. If you enter a number greater than 2 for the time units, ‘2’ will be saved – i.e. your timer will be programmed in seconds.
When you have programmed all six values, the timer will immediately start with the ON cycle closing the relay with the green and orange LEDs on. When the OFF cycle starts, the green and orange LEDs will be off. As long as the timer remains connected to the power, it will continue to repeat the ON and OFF cycles with the programmed settings.
The programmed ON and OFF durations are stored in non volatile memory, and so will be retained even when you disconnect the circuit from the power. Therefore, you only need to go through the programming steps if you want to change the ON and/or OFF duration for some reason.
Timer Accuracy
The accuracy of the timer is better than around 1%, i.e. over the course of an hour the timer may gain or lose 30 or so seconds (usually far less). Therefore the timer is not suitable for use where exact timings are required – e.g. if you want something to be turned on at exactly the same time every day (since the times will drift over days and weeks).