In general when using an Arduino Pro Mini in one of our projects or products, we use an external LP2940CZ-5.0 voltage regulator instead of the on board regulator. This is because most things we make are for 12V battery systems, and the voltage from a 12V battery can get to well over 12V which is the specified upper input voltage for a Pro Mini. We have measured that one of these regulators with a 10uF capacitor across its 5.0V output, draws a quiescent current of only 0.079mA.
We have found that an Arduino Pro Mini, whether powered as described above, or with the on board regulator draws around 20mA @ 12.0V. This is very high for an always on battery powered device – it will use 500mAh (0.5Ah) of battery charge per day. Therefore, we are always interested in testing ways to minimise power consumption.
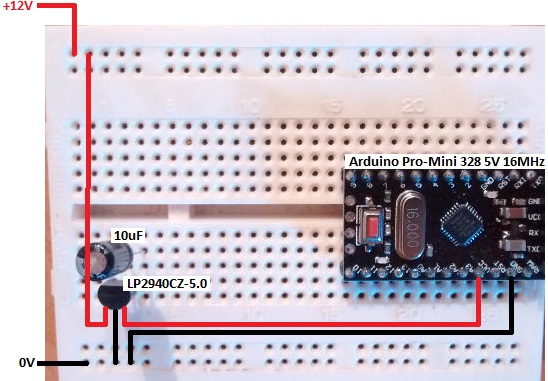
We set up the above test circuit with a 12V input, and our usual LM2940CT-5.0 regulator connected to an Arduino Pro Mini (16MHz / 5V). With a sketch containing just delay(8000); in the loop() function – i.e. the Arduino will wait 8 seconds, then wait another 8 seconds, then wait another 8 seconds, etc – we measured a current draw of 19.793mA @ 12.0V input voltage.
We downloaded and installed the following Lightweight low power library for Arduino – LowPower.h, and modified our test sketch as shown below to power down the microcontroller for 8 seconds within the loop.
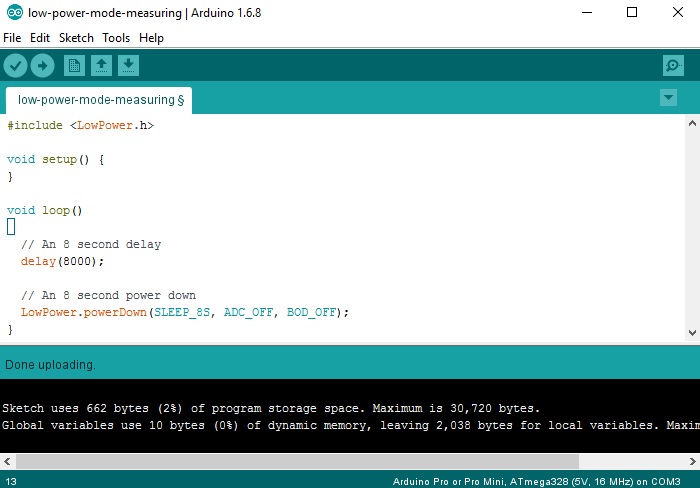
This time we measured the current draw to be just 6.265mA @ 12.0V input voltage – a huge reduction of around 70% power consumption obtainable just by replacing the delay function with the powerDown function from the LowPower library.
We make a lot of dataloggers and monitoring devices which spend most of their time doing nothing – just waiting to take the next measurement. Therefore this low power library is a quick and easy way to reduce power consumption.
(Note that 8 seconds is the maximum power down duration that can be set with this library, but by using loops of multiple 8 second intervals in your sketches, you can create a low power consumption delay of as long as you want.)
 If you use a Standalone Arduino on a breadboard directly powered by a battery pack of the correct voltage (i.e. no voltage regulation required), it is possible to run your Arduino off less than 50uA @5V (<1000th the power consumption of our tests above) and therefore power something for years with a AA cells or smaller. See here for an excellent article How to Run An Arduino For Years on a Battery from the Open Home Automation website where they use the JeeLib low power library with a standalone Arduino.
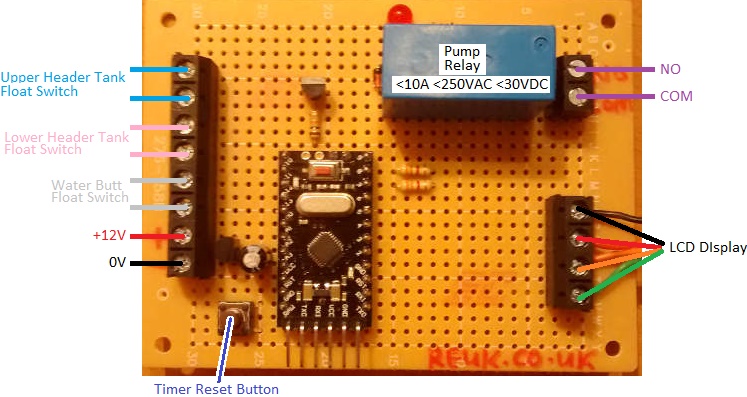 It is designed for a standard system which has two float switches in the header tank (one near the top and one near the bottom) as well as a float switch near the bottom of the water butt to prevent the pump running when there is no water to pump.
 With this timing information, and knowing the flow rate of the pump used, it is possible to easily calculate the volume of rainwater which has been supplied to the toilets and therefore how much mains water (and therefore money) has been saved with the system.