Triple Independent Repeating Timer for Lighting Control

Pictured below is a bespoke timer we recently made for a customer which includes three user programmable independent repeating on/off timers for controlling LED lighting.

three independent timers with a single master controller

This device built around an Arduino Pro Mini has three 12V outputs each of which can be set to turn on for from 0.5 to 15 seconds (in 0.5 second steps) and then turn off for from 0.5 to 15 seconds (in 0.5 second steps). This is a repeating timer, so each of the independent on/off cycles continues for as long as the timer is powered.

The user’s programmed settings are stored in non-volatile memory, so whenever the device is disconnected and then reconnected to the 12V power source, the timers continue as previously set.

If you need any kind of timer, please email neil@reuk.co.uk with details of your requirements.

28 Day Timer

Pictured below is a device we recently made to turn any typical 24 hour 7 day timer into a 24 Hour 28 Day Timer.

28 Day Timer

This particular unit was designed to run a pump for 20 minutes once every 28 days to supply an unattended irrigation system header tank with water. The user simply has to programme their existing programmable 7 day timer to turn on for the desired duration once per week. Our add-on board detects when that timer’s internal relay closes, and every fourth time (i.e. fourth week), it closes its own relay which turns on the pump.

Red LEDs on the board are used to show which week it currently is out of the four weeks that make up 28 days, and those LEDs also flash whenever the timer is on to give visual confirmation of the status of the system.

Programmable digital timers have a back up battery which ensures that time is kept accurately during a power cut. Our board stores the current week in memory, so that in the event of a power cut, it will remember which week it was in when power is restored.

If you need any kind of special timer, please email neil@reuk.co.uk with details of your requirements.

Rainwater Toilet Pump Controller with Display and Timer

Pictured below is another of our rainwater toilet pump controllers  which we recently built and supplied.rainwater toilet pump controller with display and timer

This particular unit will be used in a system configured as follows:
There is a large water butt with 2000 litre capacity (to which a further 1000 litre capacity will soon be added). There is a 210 litre header tank which gravity feeds the toilets in the property. The header tank has a float switch near the top to detect when it is full, and a float switch near the bottom to detect when it is nearly empty. The pump chosen can fill the header tank from empty in around 6 minutes, and the pump has its own float switch protection (so that it will not run dry if the water butt is empty). Finally there is a solenoid valve fitted to a mains water supply which when turned on, will fill the header tank.

header tank not full display rainwater toilet pump controllerThe controller has a display which is used to show the status of the header tank – full, not full, or empty – and also the status of the pump and solenoid valve.

solenoid valve on water butt empty display

Once an hour, the controller will turn on the pump if the upper float switch indicates that the header tank is not full. The pump will run until the upper float switch floats on a full tank OR for 8 minutes since if the pump runs that long, the water butt must be empty or there is a problem with the pump.

If at any time (except while the pump is running) the lower float switch indicates that the header tank is empty, the solenoid valve will open sending mains water into the header tank until the upper float switch indicates the tank is now full.
After another hour has passed, the controller will attempt to top up the tank with rainwater as normal, and will only top it up with mains water if the tank is empty.

If you need a rainwater toilet pump controller, email neil@reuk.co.uk with details of your requirements. Take a look at some of our previous controllers here: rainwater.

Target Shooting Lights Controlling Timer

Pictured below is a timer for use in competitive target shooting. Usually we make turning target controllers which turn the target to face and away from the shooter at the required times. This controller instead is for use with a fixed target, using a red and a green light to tell the shooter when to shoot.

shooting target lighting controllerThe red light starts off on. The start/stop button is pressed and the range master gives a vocal command for shooters to load. After 30 seconds, the red light turns off and the green light turns on – shooting commences. After a user programmable timer period has elapsed, the red light turns on again, the green light turns off, and shooting stops.

With this particular controller, the available timing options are fixed as 4, 6, 8, 10, 20, or 150 seconds. The timer option button is used to cycle through those options with red indicator LEDs used to show which option is currently selected. (We also make timers like these with a physical display and the ability for the user to change the values of the timing options instead of having a fixed selection – see here for details of some of our other shooting timers.)

The type of bulb to be used with controller is pictured below: a low current 12VDC powered 22ds LED bulb from Onpow.22ds 12vdc LED bulbIf you need any type of shooting range timer, please email neil@reuk.co.uk with details of your requirements.

Animal Feeder Motor Controller with Timer

Pictured below is a motor controller we made recently for an automatic animal feeder system.

Animal feeder motor controller with timerThe feeder itself has two buckets on a belt which is connected to a 12VDC motor. When the motor is run, the buckets scoop up feed from a container and drop it into a trough for the animals. If the motor is left running, more and more feed will be scooped up and added to the trough, so a controller was required to ensure that each time the motor was run, the correct amount of feed was deposited in the trough reliably.

The motor needs to run for less than one minute each time, therefore a 12V programmable digital timer was chosen. The user can programme the timer to turn ON for one minute at the exact times of day that the animals are to be fed.
A switch was added to the mechanical setup which closes each time the buckets have completed one full revolution – i.e. picked up and deposited feed.

The central controller waits for the timer to turn ON. Then it turns on the motor, and keeps it running until it detects the mechanical switch closing indicating that the feed buckets have been through one rotation.
When the timer next turns ON, the switch status is ignored for the first couple of seconds (since it remains closed until the motor has moved the buckets around a bit), and then the controller keeps the motor running until the switch closes again…another feed complete. This automatic feeder will keep the animals fed the right amount at the right times of day for as long as there is feed left to be scooped up.

If you need any kind of timer or motor controller, email neil@reuk.co.uk with details of your requirements.

Timer for Poultry Egg Incubator

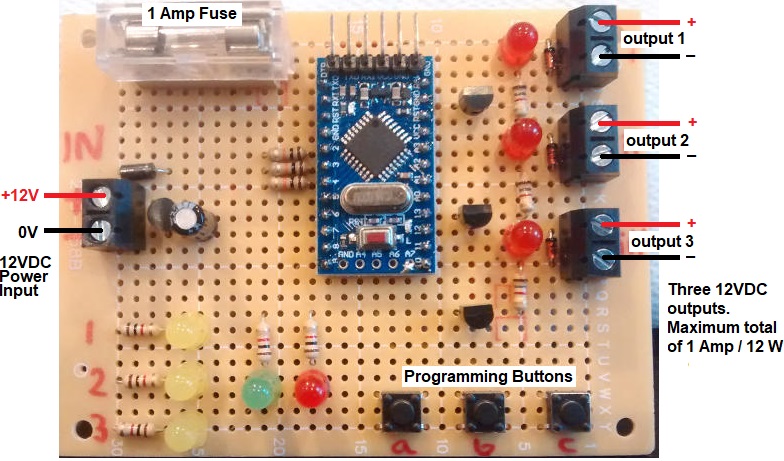
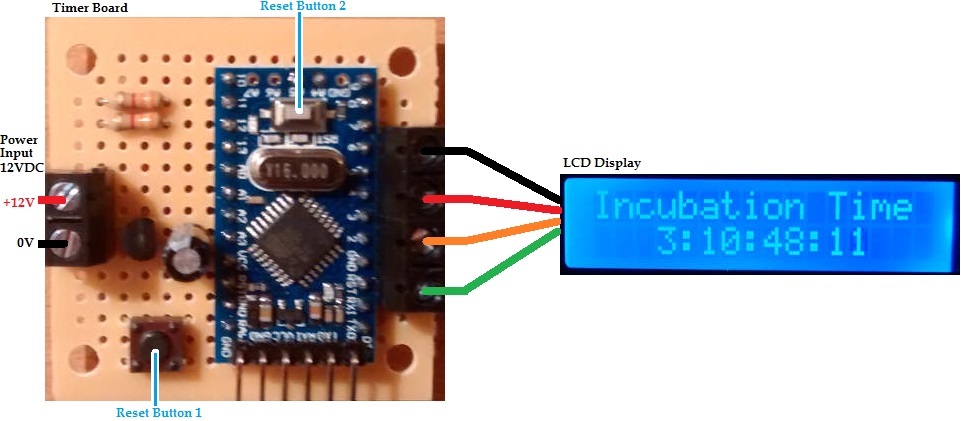
Pictured below is a timer we built to accompany a Poultry Egg Incubator Controller we made recently.

timer for poultry egg incubatorWhen incubating eggs it is very important to keep track of the time since they were laid since, for example, eggs must be turned regularly until the last few days before hatching, and for some eggs the temperature and humidity ranges need minor adjustments during the incubation period.

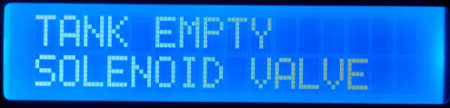
Our timer is 12VDC powered like the incubator, and has a display to show the elapsed time since it was last manually reset. The time is shown in days:hours:minutes:seconds format.

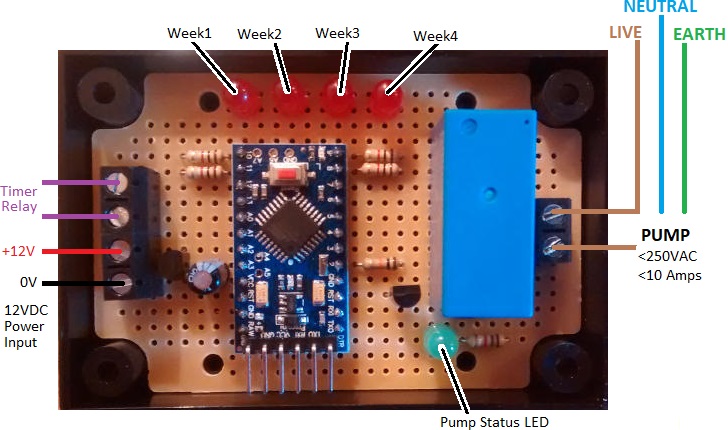
Since eggs take anything up to 6 weeks to hatch, the time elapsed is stored in memory on the timer microcontroller every 15 minutes so that if the power to the timer is cut for any reason (e.g. flat battery or accidental disconnection of one of the power leads), when the timer is reconnected to power, it will restart from within no more than 15 minutes of where it was before the power cut.

After incubation has finished, a reset button (Reset Button 1) must be pressed for 1 second to reset the timer to 0:00:00:00 ready for the next lots of eggs to go into the incubator.resetting poultry egg incubator timer

This timer is built around an Arduino Pro Mini. The microcontroller with its on board crystal keeps time well enough for this application. (If more accuracy was required we would have added a real time clock (RTC).). Reset Button 2 on the timer resets the internal clock which is limited to 4,294,967,295 milliseconds (just under 50 days) – plenty of time for pretty much everything up to ostrich eggs, but not long enough for emperor penguin, albatross, and some cuckoo eggs. For exotic eggs with very long incubation periods, an RTC would need to be added.

If you need a timer or a poultry incubator controller, email neil@reuk.co.uk with details of your requirements.

Automatic Dawn Dusk Gate Opener

24v dawn dusk gate controller openerPictured above is a controller we made recently for a gate which is to be opened at dawn and closed at dusk automatically.

The controller is based around our standard REUK Dawn Dusk Relay Controller which uses a light detector and user calibration to detect the arrivals of dawn and dusk depending on measured ambient lighting levels.

This particular unit is designed to control a large gate motor which requires two contacts on its electronics to be shorted out (connected together) for one second to toggle the state of the gate – i.e. open the gate if it is closed, or close it if it is open.

When dawn is detected, the on board relay closes for one second which opens the gate. Then, when dusk is detected, the relay closes again for one second which closes the gate. The controller has a selection of timers and automation logic built in which prevent false dawns and false dusks being detected when there are clouds moving across the sun early and late in the day.

If you need any kind of dawn/dusk detecting controller, email neil@reuk.co.uk with details of your requirements.

Irrigation Pump Timer with Low Voltage Disconnect

Pictured below is a device we made to control the pump of an automatic and often unattended irrigation system which is solar powered.

irrigation system pump control timer with low voltage disconnectprogrammable digital timer is set with the times that the pump is to be run – typically very early in the morning and in the evening. The pump for this particular irrigation system is relatively high powered, so could not be switched directly by the timer. Therefore a 10A rated relay is built into the controller.

As this system is solar powered and also often left unattended, it was essential to include a low voltage disconnect which will automatically prevent the pump from running whenever the measured battery voltage is found to be <11.9V. It then waits until the battery has been charged back up to over 12.5V before allowing the pump to run again.

LED indicators are included to show when the programmable timer is ON, the status of the low voltage disconnect, and also the status of the pump switching relay.

If you need any kind of irrigation pump timer or controller please email neil@reuk.co.uk with details of your requirements.

Picaxe Based Dual One Shot Timer Relay with Code

Pictured below is a simple timer relay circuit we recently made which we will detail here together with the source code for the microcontroller since we have had many requests for example code for timers of this type.

Two option one shot timer relay circuit - PICAXEWe received a request for a timer with two buttons. Pressing the first button was to cause a relay to close for 10 minutes, and pressing the second button was to cause the relay to close for 30 minutes. The relay was to be used to switch a mains powered appliance.

In our article Make a PICAXE Repeating Timer, we show how to make a repeating on/off timer using a PICAXE microcontroller. The timer pictured above differs in that it has button inputs to deal with and also a one-shot instead of repeating timer.

The red LED is used to show which timer is running – off, but flickering on briefly once per second is the 10 minute timer; on, but flickering off briefly once per second is the 30 minute timer. The green LED is connected across the coil of the relay (with a current limiting resistor) to show when the relay is closed.

The PICAXE code below could be greatly reduced in length but to keep it simple to read through, understand, and adapt, we have left it with separate functions for the 10 minute and the 30 minute timers (instead of making one general function which could run for any duration in response to any button press).

symbol button1 = pinC.1
symbol button2 = pinC.2
symbol led = C.0
symbol relay = C.4

' Start with the relay open and the red LED turned off.
low relay
low led

main:
   if button1 = 1 then goto run10minutes
   if button2 = 1 then goto run30minutes
   pause 100
   goto main

run10minutes:
   'make sure button is held a little before closing the relay,
   high led
   for b0 = 1 to 5
      delay 50
      if button1 = 0 then 
         low led
         goto main
      endif
   next b0

   'Close the the relay
   high relay 

   'wait for the button to be released.
   do
      pause 50
   loop while button1 = 1

   low led

   for b0 = 1 to 10 'minutes
      for b1 = 1 to 60 'seconds
         high led
         pause 100
         low led
         pause 900
      next b1
   next b0

   'Open the relay.
   low relay

   goto main

run30minutes:
   'make sure button is held a little before closing the relay,
   high led
   for b0 = 1 to 5
      delay 50
      if button2 = 0 then 
         low led
         goto main
      endif
   next b0

   'Close the the relay
   high relay 

   'wait for the button to be released.
   do
      pause 50
   loop while button2 = 1

   low led

   for b0 = 1 to 30 'minutes
      for b1 = 1 to 60 'seconds
         high led
         pause 900
         low led
         pause 100
      next b1
   next b0

   'Open the relay.
   low relay

   goto main


Archery Timing Circuit

timing circuit for competitive archery trainingPictured above is a timing circuit for archery competitions. Outdoor archers shoot six arrows in one go and are allowed 4 minutes. Indoor archers shoot three arrows in one go and are allowed 2 minutes.

The user can select one of two options – option 1 (outdoor) and option 2 (indoor) for either a two minute or four minute competition. The controller board itself has a red, yellow, and green LED on it and a small buzzer. There are also four relays which can control larger lights – e.g. when the red LED is illuminates, a relay will be closed which can control multiple large red lights. The same is repeated for each LED and also for the buzzer relay which can control multiple buzzers or sirens.

The Mode button is used to select the desired timing option. The red LED will be on while the controller is sleeping. When the Start/Stop button is pressed, the timer starts and the green LED turns on. With the outdoor timing option, the green LED stays on for 3 minutes and 30 seconds. With the indoor timing option, the green LED stays on for 1 minute and 30 seconds. Then the yellow LED turns on to give the archer notice that their time is running out. After 30 seconds the red LED turns back on again and the buzzer sounds briefly to indicate that time is up, and the device is reset ready for the next archer.

While the timer is running, you can press the Start/Stop button to cancel the timer and reset the controller. Alternatively, you can press the Pause button to pause the competition. The buzzer sounds 3 times quickly to indicate that the competition has been paused and then when the Pause button is pressed again, the buzzer sounds 3 times. The timer continues from where it left off exactly after the buzzer sounds for the third time.

If you need any kind of bespoke timer device, email neil@reuk.co.uk with details of your exact requirements.