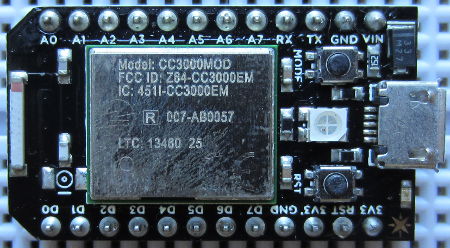
Spark Core is described as an Open Source IoT (Internet of Things)Toolkit. It is a small Wi-Fi development board which connects automatically to servers in the cloud, and can be programmed and controlled remotely over the internet and also send data to the cloud where you can access it.

The Spark Core board is programmed using Wiring – the same programming language used with Arduino – but via a browser based IDE. Therefore you do not physically connect the board to your PC. Instead you just power it, it connects to your Wi-Fi automatically (with credentials entered during a one off setup process), and then automatically connects to the Spark servers. You then write your Wiring code in your web browser, it is checked and compiled on the Spark servers and the code is then flashed to your board over Wi-Fi and starts running.
Each Spark Core has a unique device ID with an associated secret access code so no-one else can take over your Core or access the data from it.
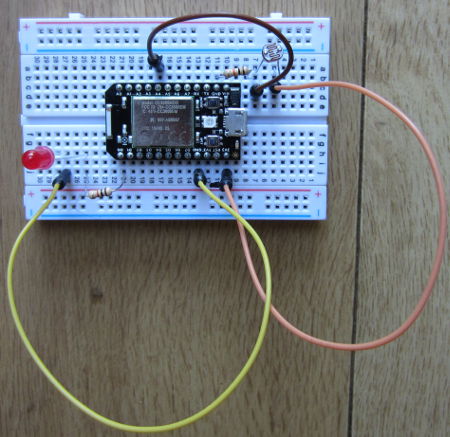
To try out Spark Core, we put together a very simple setup just to measure the ambient light level.
Spark Core is supplied with its own prototyping breadboard. We connected a light dependent resistor (LDR) to one of the regulated 3.3V output pins, and to one of the ground pins via a 10K resistor. This creates a voltage divider (where the LDR meets the resistor), the output of which we connected to analog pin A4. (In the photograph above, we also have an LED connected via a current limiting resistor to digital pin D0).
The analog pins on the Spark Core are 12-bit analog to digital converters (ADC). Therefore, they measure the voltage on the pin and give it a proportional digital value from 0 to 4095 where 0 is 0V and 4095 is 3.3V.
const int ldrpin = A4;
int lightlevel = 0;

void setup(){
   pinMode(ldrpin, INPUT);
   Spark.variable("lightlevel", &lightlevel, INT);
}

void loop(){
   lightlevel = analogRead(ldrpin);
}
Above is the Wiring code we wrote to continuously save the digital conversion of the measured voltage on pin A4 (here called ldrpin), as a variable lightlevel. Defining the Spark.variable lightlevel in setup makes it accessible via the Spark servers.
With that code flashed to the Spark Core and running, you can now instruct the Spark servers to grab that variable (with the Spark API). The simplest way to grab the lightlevel variable is to enter a URL in your web browser like this:
https://api.spark.io/v1/devices/YOURDEVICEID/lightlevel?access_token=YOURACCESSCODE
…obviously substituting in the device ID and access code for your own Spark Core. The browser will then display something like this:
{
  "cmd": "VarReturn",
  "name": "lightlevel",
  "result": 2961,
  "coreInfo": {
    "last_app": "",
    "last_heard": "2014-08-03T11:21:32.577Z",
    "connected": true,
    "deviceID": "YOURDEVICEID"
  }
}
So, in this example the light level was measured by the Spark Core to be 2961 (meaning that the voltage on the pin was 3.3*(2961/4095) Volts).
Instead of measuring a light level, we could have connected any other digital or analog sensors – temperature sensors for example – pre-processed the collected data on the Spark Core board to be saved as useful values which we could view from anywhere in the world.
For a final test, we wrote a very short Python script on an internet connected Raspberry Pi to grab just the value of lightlevel out of the file returned by Spark and to print it out.
#!/usr/bin/python
import urllib2
import json
response = urllib2.urlopen('https://api.spark.io/v1/devices/YOURDEVICEID/lightlevel?access_token=YOURACCESSCODE
html = response.read()
reading = json.loads(html)
lightlevel = reading['result']
print lightlevel
This was saved as file core.py and run using the command sudo python core.py in the terminal. In under one second, the value of the light level measured on the Spark Core was displayed. With a slightly more complex Python script or using cron the light level could be checked every 5 minutes or other interval and logged to a file for later analysis etc.
All in all, first impressions of Spark Core are very favourable. While we have previously used ethernet shields with Arduino to enable remote control and monitoring over the internet, this has necessitated messing around with broadband router settings and firewalls etc. With Spark Core everything happens automagically which makes things a lot simpler for the average user and opens up many Internet of Things possibilities.
Click here to visit the Spark.io website for more information about Spark Core.
