Are Prices of Solar Panels Going to Stop Falling or Even Rise?

The prices of photovoltaic solar panels (PV) have been falling consistently for years, and particularly for the last couple of years. The success of generous feed in tariffs in Germany first and subsequently in the UK amongst other countries greatly increased the demand for PV solar panels, demand which was rapidly met by new Chinese manufacturers.

Suntech solar panels

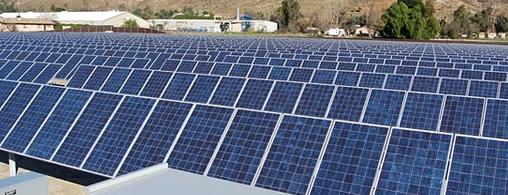
Thanks to large government subsidies solar panel manufacturing boomed in China with companies such as Yingli and Suntech selling more and more PV panels at lower and lower prices grabbing well over three-quarters of the world solar market. Panel prices are now a quarter what they were in 2007/8. Global manufacturing capacity is now over 60 Gigawatts per year, but demand in 2013 is predicted to be half that at just 25-30 Gigawatts.

Subsidised over-production resulted in panels effectively being sold at a loss and now many of China’s 500+ solar module manufacturers are deep in debt and facing bankruptcy with no sign of a bail out from the government. It is likely that there will be many business closures, consolidation, and reductions in supply in the coming months and years as the market adjusts itself.

At the same time commercialisation of new technologies which offer more efficient solar panels which can be made more efficiently, more cheaply (with future economies of scale) and with less damage to the environment has been delayed because consumers’ demand has been met with the (unsustainably) cheap conventional silicon PV modules.

Even with the latest manufacturing processes, cheap labour, and government subsidies, existing technology solar PV is still more expensive than fossil fuels. Until there is commercialisation of more advanced solar PV technology we will not see PV compete on a level playing field (i.e. without subsidies) and beat fossil fuels on price.

GE thin film photovoltaic solar panels

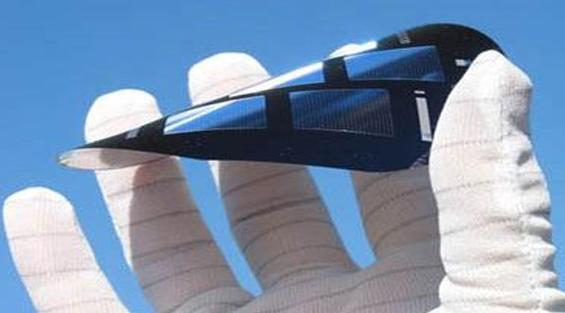
Therefore although in the short term we can expect solar module prices to level or even rise a little, this will finally open the door to the commercialisation of new technologies currently waiting in the wings (e.g. thin-filmsolar panels) which in the medium/long term will finally give us economically sustainably low-priced fossil fuel beating panels.

Project of the Day – 24V Low Voltage Disconnect

Pictured below is one of our standard programmable 12V low voltage disconnect (LVD) circuits which has been modified for 24V battery systems.

24V low voltage disconnect - LVD

The base circuit board used is one we designed and have made for us which is a multi-use board with a high quality matching enclosure. By soldering a few jumper links on the back of the board we can change its functionality, inputs, and outputs so that it meets the requirements of whatever project we are working on. We designed the board with a small prototyping area in the middle to which additional components can be added if required.

In order to use this board for a 24 Volt low voltage disconnect things were a little tricky as all on board components are designed for 12 Volts. Therefore we first added an LM317T voltage regulator (using R1=330R, R2=2K8 resistor) and screw in terminals for the 24V battery to be connected to. The 11.8V outputted from the regulator was then connected on the underside of the board to the usual 12V input terminals which are now not used.

We then added a voltage divider to reduce the approx 24V input voltage sufficiently so that it can be measured using the analog to digital converter (ADC) on the PICAXE-08M2 microcontroller – we needed less than 5V across the full range of input voltages from the 24V system (e.g. up to at least 30V), and wanted to set this up so that the digital value given when 24.00V is connected to this new LVD is the same as that given when 12.00V is connected to the standard LVD.

The ADC converts the voltage it is seeing into a 10-bit digital value from 0-1023 where 0 will be the value if the voltage is zero, and 1023 will be the value if the voltage is equal to the supply voltage of the microcontroller (5.00V in this case).

With the accurate 470K/100K voltage divider we use on the standard 12V LVD we get 35.922 per Volt – i.e. input 12.00V to the circuit, the voltage divider will reduce this before it gets to the ADC (to 2.553V) and the ADC will output 12.00*35.922 = 431. We have hard-coded the 35.922 multiplication factor into our 12V LVD and everything else is worked out from it.

We hand-calibrated the new voltage divider (because the resistors we used in it only have a 10% tolerance). We simply inputted a 24.00V voltage and measured the voltage seen on the ADC pin with an accurate multimeter. DIviding this voltage by 5.00V and multiplying by 1023 to get the ADC value we got 398, less than the 431 it would have been if the resistors were high tolerance. Dividing 398 by 12V we found that the multiplication factor for our 24V LVD was 33.135 per Volt, so we simply changed that one value in the microcontroller code and everything worked perfectly – the only difference is that the user can set the cut in and cut out voltages in 0.2V steps now instead of 0.1V steps.

Project of the Day – Warning Watch Timer for Solo Sailor

Today we made the yacht watch timer pictured below. It was ordered by a solo sailor to use to ensure that she does not fall asleep for too long while on watch (checking the horizon for potential dangers).

Timer to keep solo sailor awake

As this is such a vital piece of equipment, we actually put two independent timers onto the same circuit board doubling up on all components including the warning buzzers. Therefore if a component on one of the timers fails, the second timer will continue to work perfectly.

The user can set the number of minutes the timers are to run before the warning piezo buzzers sound – e.g. 5, 10, 15, 20..etc minutes. Timer-2 is then automatically set to run for one minute longer than Timer-1.

While the device is connected to the 12VDC system on board, a pair of panel mounted LEDs flash once every second to show that the timer is running. Each time the sailor checks the horizon they press a panel mounted button to restart the timer countdown.

push to make reset button for timer

If the sailor falls asleep or forgets to keep watch then when the timer has run down Timer-1’s buzzer will sound for one minute. (We left the protective sticker over this buzzer to keep the sound level down.) If the sailor still does not press the button during that minute, then Timer-2’s buzzer will start to sound very loud and continue to sound until the button is pressed.

The sailor will fit an ON/OFF switch before the timer device. Each time it is switched on, both LEDs will light up and the two buzzers will sound for one second to confirm that everything is working as it should. The programmed number of minutes for the timer are stored in memory and are not lost when power to the device is disconnected.

The timers are built using Picaxe-08M2 microcontroller chips each powered via its own 5V regulator. The device is fitted with reverse polarity protection.


REUK Have a New (Old) Camera

REUK finally have a new (old) camera with excellent macro functionality – the Canon IXUS 220HS. Expect better photographs on the REUK.co.uk website – particularly close-ups of elecronics.

macro-lens-testing-reuk

This camera first came out in 2011 offering a 12.1 megapixel sensor, 5x optical zoom, and full-HD video recording, priced at around £200. It is now available new for around £100 and used from just £40.

macro-lens-testing-zoom-reuk

We are certainly very happy with it so far. It really pays to buy high quality electronic devices a couple of years after their release to know for sure what you are getting, that it has all the functionality you need, and to get it at a great price.

Project of the Day – Dawn / Dusk Raspberry Pi Switch on Device

Pictured below is a device designed to switch on a Raspberry Pi for a user programmable number of minutes at dawn and dusk as detected by a light detector. Under normal circumstances the Raspberry Pi itself could be used to detected day and night, but although the Pi is a very very low powered computer (2.5 Watts), that is a relatively large amount of power if it is to be on continuously 24 hours per day powered by a solar charged battery, as was our customer’s requirement.

dawn and dusk detecting controller to power a Raspberry Pi

Instead of leaving the Raspberry Pi running continuously, this intermediate controller circuit supplies power to the Pi only when required, and draws only a few milliAmps of current rather than hundreds of milliAmps of the Raspberry Pi.

The controller circuit we have built is based around a Picaxe-08M2 microcontroller. The user can set the light level threshold at which dawn and dusk are detected (using similar logic to that successfully used in our dawn dusk relay controller), and the number of minutes that the Raspberry Pi is to be powered at dawn and at dusk.

A MOSFET is used to supply a 12V output at dawn and dusk which passes through the 5V from 12V regulator pictured below to supply the required 5 Volts DC to the Raspberry Pi.

5-volt-regulator-for-raspberry-pi

Normally we would fit voltage regulation directly on our circuit board, but it is not possible to buy even half the components on this ready made 3 Amp rated 90% efficient 3.3V / 5V from 12V regulator (priced at £1.12 including delivery) so we used that. We just soldered 12V+, 12V-, and 5V+ leads to the regulator, and screw-in connectors on the output side of our controller to hook it up. A couple of terminals on our board then supply the regulated 5V voltage to the Raspberry Pi at dawn and dusk.

This will be put to use in a hen house door controller. The Raspberry Pi, extended with a Gertboard attached to the GPIO interface will be used to control a motor which will open/close a horizontally sliding door. Microswitches will be used to detect when the door is fully open/closed, and the Raspberry Pi will give feedback to the user by sending him an email. A camera may also be added to the setup in the future.

LM2596 Variable Voltage Regulator with Built in Voltmeter

We have just purchased one of the voltage regulators pictured below for REUK product testing. This is a variable voltage regulator which will accept inputs of from 4-40V and output a user set voltage from 1.3-37V at up to 2 Amps. (Input voltage must be at least 1.5V higher than user set output voltage)

lm2596 voltage regulator with voltmeter display
This device is just 3.5 x 6.0cm in size and includes a display to 0.1V resolution of the measured input and output voltages AND it costs a hard to believe £3.51 delivered to anywhere in the world from China.

We will add lots of information about this device together with some photos just as soon as we are done testing. For now, here is a link to get your hands on one or more of these LM2596 regulators to test for yourselves.

Largest Concentrated Solar Power Plant in the World – Shams 1

The world’s largest concentrated solar power plant started operation on Sunday 17th March 2013.  Costing US$600 million to build, Shams I is located in the desert in the west of Abu Dhabi. The 100 Megawatt power plant will supply electricity to more than 20,000 homes in the United Arab Emirates.

solar-power-plant-shams

100MW Solar Power Plant – Shams I

Covering 2.5 square kilometres, Shams I is an array of 768 solar tracking mirrored parabolic troughs which concentrate the sun’s energy onto a pipe running through the troughs through which oil is pumped. This solar heated oil then passes through a heat exchanger generating steam which drives an electricity generating turbine. More than 250,000 mirrors were used in the construction of the parabolic solar collectors.

solar-concentrators-shams

Shams I – 768 tracking parabolic solar concentrators

Shams I has a dry-cooling system which greatly reduces the amount of water this power plant will use – a vital feature considering its arid desert location. Dry-cooling uses the air to condense exhaust vapour from the steam turbine instead of water. Water cooling is cheaper where possible/practical, but the best geographical locations for solar generation unfortunately tend to be very dry places. It is approximately 5% more expensive to build a concentrated solar power plant with dry-cooling, and the electricity generated will be 10% more expensive than from a water cooled power plant.

At US$600,000,000 for 100,000,000 Watts of installed power, it sounds quite expensive – US$6 per Watt, but perhaps it was all of the associated infrastructure which added to the cost rather than the choice of solar concentrator technology over simple solar photovoltaic technology.

Comparing the costs of this solar concentrating power plant with solar photovoltaic power plants of equivalent size, the Rovigo PV Power Plant in NE Italy cost 276 million Euro for 72MW of installed PV capacity when it was built in 2010 becoming briefly the World’s largest PV power plant (US$5 per Watt), but since then the much larger 145MW Neuhardenberg Solar Park in Germany was constructed for US$365 million, or just US$2.50 per Watt.

12V High Torque Motors

We have been selling hen house door controllers now for a few years: hen house door controller. Nothing too complicated, just a programmable timer or light detector based controller to turn a motor in one direction in the morning to open the door, and then turn the motor in the opposite direction in the evening to close the door.

We have always recommended using motor car windscreen wiper motors for this application as they are cheaply available, robust, strong, and reversible. But, they are also large, heavy, different motors have different power/current requirements, and they all use far more power than is ideal for this project necessitating big relays and thick cables.

30 RPM 12VDC high torque motor

30 RPM 12VDC high torque motor

After much searching and testing we have finally found an alternative motor which we are happy to recommend for this application. It is a good quality motor fitted to a sturdy gearbox giving a high torque (120 N.cm) low speed (30 RPM) which is perfect for slowly raising a lowering a hen house door.

The motor has a wide diameter (6mm) sturdy shaft onto which it is easy to glue a spool or cog. With a 12.0V supply, this motor draws a super low 40mA (0.04 Amps) when there is no resistance up to a maximum of 500mA (0.5A) when working at its maximum

These motors are priced from £5-8 delivered (from HK / China), so they are also economical too. Click here for more information: 30 rpm high torque 12V geared motors.

There are many other uses for these low power high strength motors which we’ll be exploring soon.