Solar Pump Controller with Timer Override

In our blog post Solar Water Heating Pump Controller with LCD we showed a controller which incorporated a timer override so that the user could force the pump of their solar water heating controller to run at certain times of day or night – for example in the winter to protect against frost, or for any other reason.

This has proved to be quite a popular added feature, so we can now also offer it on request to our 2014 Solar Water Heating Pump Controller with LCD.

Override solar water heating pump controller with a digital programmable timerThe controller works exactly per the standard 2014 controller, just with a pair of added screw in terminals to which a manual switch or suitable programmable timer switch can be connected for more control.

If you require a solar water heating pump controller with this added feature, please email neil@reuk.co.uk with details of your requirements.

Size Comparison of Pyboard with Raspberry Pi and Arduino UNO

We have just received our Pyboard – a prototyping platform that runs Micropython which is an implementation of the popular Python programming lanuage.

Micropython PyboardAbove is the Pyboard in the hard shell padded case in which it arrived. It looks to be very well made, sturdy, and best of all, physically very small.

Size comparison between Pyboard, Raspberry Pi B+ and Arduino UNOThe photo above shows just how small the Pyboard is in comparison with the Raspberry Pi Model B+, and an Arduino UNO.

We have lots of projects in the pipeline for which we would previously have used a Raspberry Pi, but the simplicity, size, and much lower power consumption of the Pyboard will often make it the obvious option.

Nabduino Remote Access Board

Pictured below is Nabduino – an “open source peer-to-peer remote access embedded board with a user modifiable web-interface developed by Nabto“.

Nabduino board

This small board (available to purchase here: buy Nabduino) can be accessed via a direct encrypted connection through a firewall without the need to change the firewall settings of your router.

If for example you set up a server on a Raspberry Pi – that server will only be visible on your local network unless you change settings on your router to make it visible world wide. If your that server is not set up correctly, then your whole network is at risk – therefore this is best left to experts. Having set up that server, you then need either a static IP address (not usually free of charge) or set up some web services (sometimes free, sometimes not), so that you can find your server when you are outside the local network.

The Nabduino board makes things a lot easier and safer than all that trouble. You simply connect an ethernet cable connected to your local network to the board, connect power to the board, and that is it. Each Nabduino board has a unique ID, and there is a simple web interface which gives you access to the board and its sensors etc accessible from anywhere in the world at XXXX.nabduino.net where XXXX is the ID of your board.

web interface for nabduino board

Via the simple web interface (pictured above), the state of the on board button can be viewed, an on board LED can be controlled, the temperature of the microprocessor can be monitored, five PWM outputs can be set with values from 0-255 for dimming lights or motor control, the status of six analog inputs can be viewed, and thirteen digital pins can be set to input or output and be controlled remotely.

As it stands, Nabduino could be used for simple remote control of a home via relays connected to digital outputs – for example, turning on some lights when you are away from home using your mobile phone or PC. Similarly, very basic home monitoring could be achieved with sensor switches connected to digital inputs. However, much more powerful things can be achieved connecting the Nabduino to an Arduino board so that the Arduino can respond to digital and PWM signals from the Nabduino and carry out any complex logic.

We will be looking at the Nabduino board in much more detail soon. Until then, click here to find out more about Nabto.com.

Rainwater Toilet Flush Pump Controllers with LCD

We have been making a bespoke range of controllers for people who would like to use rainwater for their toilet flushes for around 6-7 years now. Here is an example of one of our early Rainwater Toilet Flush System Controllers with details of how such a system works.

rainwater pump controller with LCD display and empty water butt sleep function
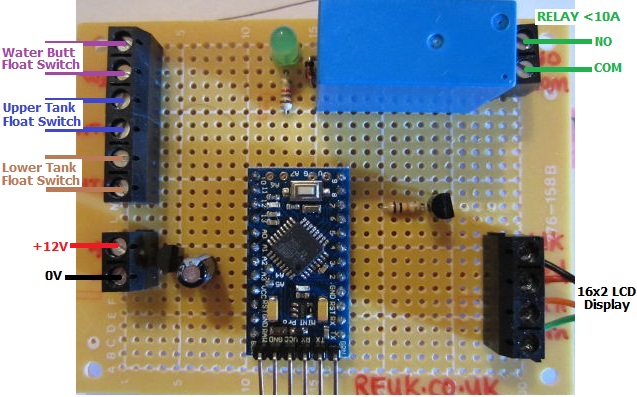
Pictured above is one of our more advanced systems which includes an LCD display to keep the user up to date with the status of the system and water levels in the water butt and header tank (which gravity feeds to the toilet cisterns in the home).

In this particular case, if the two float switches in the header tank are not in water, the tank is empty, and so the pump turns on to fill the tank. If there is sufficient water in the water butt to fill the tank, then the pump will stop when the tank is detected to be full. If however the water butt is empty (or becomes empty during pumping), then then controller sleeps for four hours to allow a rain shower to collect a good amount of rainwater (if it rains in the meantime) so that pumping later will fill the tank.

rainwater controller system normal LCD displayThe display constantly shows the status of the water butt (WB) – either OK or LOW (empty), and the status of the header tank (HT) – either EMPTY, OK, or FULL. The bottom line of the display shows whether the pump is running, the controller is sleeping, or everything is just ticking along as it should.

rainwater pump controller with mains water solenoid and LCD display
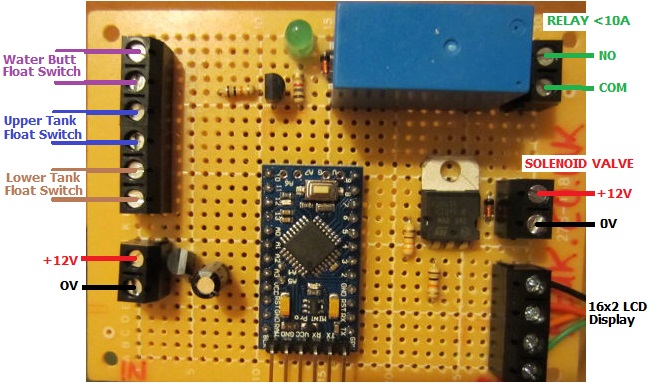
The controller pictured above is a little more advanced. If the header tank is detected to be empty, then the pump will start as normal unless the water butt is also empty. If during pumping, the water butt becomes empty (or if it is already empty when the header tank is detected to be empty), a solenoid valve will close which will allow the flow of water up the rising main to enter the header tank to ensure that the toilets can always be flushed without any manual intervention.

rainwater controller with solenoid valve activatedThe display for this particular controller also shows the user when the solenoid valve is open so they know that you are using mains water due to a lack of stored rainwater in the water butt. There is no need for a four hour delay with this unit since every time the header tank empties and the water butt is either empty or becomes empty during pumping, the mains water supply will top up the header tank.

This controller is based around an Arduino Pro Mini microcontroller development board and uses standard horizontal float switches in the water butt and header tank to detect water levels.

If you need a rainwater toilet pump controller of any type, please email neil@reuk.co.uk with details of your specific requirements.
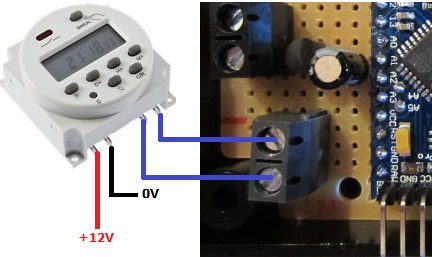
New Raspberry Pi Model B+

We have just received our new Raspberry Pi Model B+. This is not the Raspberry Pi 2 or C (which is likely to be released in 2017), but is instead a Model B with a few very useful changes and additions.

Raspberry Pi Model B+

The biggest addition is a further two USB ports bringing the total up to four USB 2.0 ports. This is particularly useful since a mouse and keyboard would use all the ports on the Model B leaving no ports free for thumb drives, and other peripherals without the use of a secondary powered USB hub.

Raspberry Pi B+ can now be configured to output a total of 1.2 Amps in total (0.6A by default) from its USB ports (assuming a good quality 2A power supply is used). Therefore external hard drives can be used without the need for a powered hub.

The original SD card slot has been replaced by a micro-SD card which means no more SD card sticking out of the Raspberry Pi, and it is easier and cheaper to buy micro-SD cards.

A further 14 GPIO pins have been added to the 26 pins found on the Raspberry Pi Model B for a total of 40 GPIO pins for hardware projects. The layout of the first 26 pins has been kept the same for backwards compatibility.

Finally, power consumption has been reduced a little, sound quality has been improved with the audio connector changed to integrate composite video, and the overall layout of the board has been changed and mounting holes added to the corners of the board.

The processor and RAM (512MB) remain unchanged.

We will be doing some interesting projects with our new Raspberry Pi B+ over the next few weeks and months to make use of the additional functionality offered by this new model.

Pyboard Python for Microcontrollers

Pyboard python for microcontrollersPictured above is the Pyboard – an open source prototyping platform designed and manufactured in the UK. This board with its ARM microcontroller (STM32F405 clocked at 168MHz) is programmed using micropython a low memory usage version of the Python 3 scripting language.

The board has LEDs, microswitches, a built in accelerometer, and 30 general purpose IO connections (including 4 PWM, 14 ADC, I2C, and SPI pins) for connection to external components and analogue/digital sensors for your projects.

The board has 1MB of on board flash memory, 192KB of RAM, and also a micro SD card slot which can be used to store scripts and hold project generated data. It has a built in USB interface.

Pyboard fits in the marketplace somewhere between Raspberry Pi and Arduino. A Raspberry Pi is a full computer which means that it can be complicated to use, power hungry, and large in size. An Arduino is simple to use, has lots of useful GPIO and shields, and they are available in small versions, but they are not very fast and scripts need to be compiled on a PC before loading them to the Arduino. Pyboard is perfect for processor intensive stand alone projects – particularly for anyone who already has experience programming with Python.

Pyboard is just 33 x 40mm in size and weighs just 6g.

The official Micro Python website is here, and the tutorial which shows how to get strarted with Pyboard and Micro Python is here: Micro Python Tutorial.