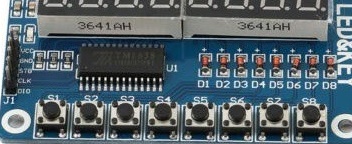
In a recent blog post, we introduced the TM1638 module – a device with multiple input, output, and display functionality available at a very reasonable price, and perfect for use with an Arduino board. Click here to buy TM1638 modules for under £2 delivered.

Of most interest to us was the pair of 4-digit 7-segment LED displays which can be driven by just three Arduino output pins (in addition to 8 LEDs and 8 input buttons). The majority of the products and bespoke devices we build and sell have a display to show measured voltages or temperature sensor readings. As the voltages measured are always from 0-35V, and the temperatures range from 0-99 degrees Celcius, we planned for each 4 digit display to show these values to two decimal places – e.g. a voltage of 12.45V (since the decimal point is included as part of the second digit unlike on LCD displays where the decimal point uses up a whole character).
An excellent and easy to use TM1638 library is available for Arduino, but did not have exactly what we needed. We want to be able to take any number from 0 to 99.9 and display it to either 1 or 2 decimal places on either the left or the right of the two 4-digit displays. In order to try and achieve this we wrote a simple rough and ready function which is provided in full at the end of this post for you to use, and is explained below.
Every one of the seven segments of each of the eight digits can be individually controlled for a total of 56 controllable segments. After installing and importing the tm1638.h library in a sketch and defining our module – refer to the excellent Introduction to TM1638 for details on getting started with TM1638 modules, the following code can be used to illuminate each of the segments on one digit each.
byte values[] = { 1, 2, 4, 8, 16, 32, 64, 128 };
module.setDisplay(values);
The array of bytes values[] holds eight elements (values from 0-255) . The first element controls the first digit, the second element the second digit, and so on. So, the first element has a value of 1 and this illuminates the top segment of the digit. The second element has a value of 2 and this illuminates the top right segment. And so on all the way up to the eighth element which in this case has a value of 128 which illuminates the decimal point of the eighth digit.
In order to illuminate multiple segments of the same digit, you simply add together the values for the segments to be simultaneously illuminated for a digit, and enter that value in the array for the digit where you would like it to be displayed.
For example, the value to display an 8 (all segments of a digit illuminated) is 1+2+4+8+16+32+64=127. If you were to fill the byte array entirely with 127’s, the display would show eight number 8s in a row.
In order to follow a number with a decimal point, you add 128 to the byte value for the number you would like to display. For example, the number 1 is given by 2+4 (illuminating the two right side segments of the digit). To do 1. you add 128 to the byte value for the number 1 to give 134. Every 134 in the byte array will result in a 1. being displayed.
Now that we know how to display any number (or character) for any digit on the displays, all that is left to do is to take the 0-99.9 valued number, break it out into its constituent digits, and display them where we want them to appear on the display.
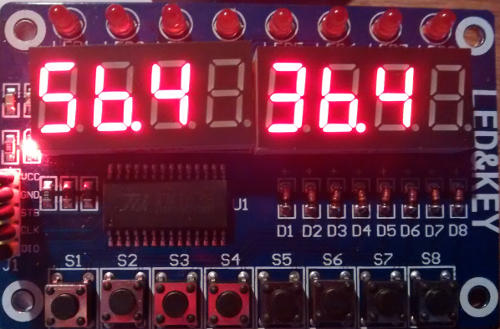
The above image shows the TM1638 module tested for use as the display for one of our solar water heating pump controllers. The value on the left is the solar panel temperature, and the value on the right is the hot water tank (or pool) temperature. In this example, we have displayed the sensor readings to 1 decimal place since the sensors are not accurate to 2dp, and if all eight digits are illuminated at the same time, it is not very easy to read the two temperature values displayed. (For our typical usage, it would be better if the two 4-digit displays were a couple of centimetres apart from each other, but other uses necessitate a full 8-digit display which requires them to be close together.)
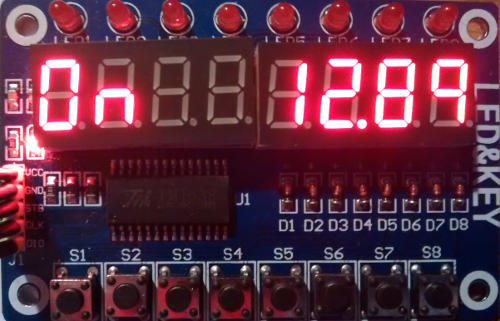
Above we have used the TM1638 module as the display for our 12V low voltage disconnect. In this case we only have one voltage measurement to display, but it is very accurate, so we have displayed it to two decimal places. That leaves us four characters to use to show system status information, in this case On (output is on because battery voltage is good). On is made with byte values 63, 84.

…and above we have Off as the battery voltage has been measured to be low. Off is made using byte values 63, 113, 113.
So, that just leaves the code itself. As mentioned earlier, it is quite ugly code – it could have been written more elegantly and efficiently, but it is fully commented and hopefully simple enough to understand and modify to your particular needs or as a jumping off point for learning and for experimentation.
This sample code just displays a number (12.5432334) to two decimal places on the LEFT four digits of the display; but you can change the number, change the position, and change the number of decimal places by amending the contents of the loop() function. You can simultaneously display a number on the right of the display by calling the displayNumber() function a second time within loop() and having your chosen number displayed on the RIGHT.
If you try and display a number below zero or of 100 or over, the display will just show —- to indicate an error.
/*
 * REUK.co.uk February 2016
 * Displaying two 1 or 2dp values less than 100 on a TM1638 module.
 *
 * An excellent starter guide to the TM1638 modules is available here:
 * http://tronixstuff.com/2012/03/11/arduino-and-tm1638-led-display-modules/
*/

// include the TM1638 library (which you must first install to your Arduino IDE).
#include <TM1638.h>

// Define a module on data pin 8, clock pin 9 and strobe pin 7
TM1638 module(8, 9, 7);

// Define constants for left and right so we can easily choose
// which side of the display to show our number
#define LEFT 0
#define RIGHT 1

// displayDigits[0] = 63 which displays a 0
// displayDigits[1] = 6 which displays a 1
// displayDigits[2] = 91 which displays a 2...etc
// Add 128 to value to display the same number with a dp following it.
// e.g. display a 2 with 91, display a 2. with 91+128=219
byte displayDigits[] = {63,6,91,79,102,109,124,7,127,103 };

// An array for the values to be displayed - all zeroes means show nothing.
byte values[] = { 0,0,0,0,0,0,0,0 };

// The digits which will make up a number to be displayed
// e.g. 25.63 will fill theDigits array with values of 2, 5, 6, and 3
int theDigits[] = { 0,0,0,0 };

void setup(){
 // Start with the digital display blank.
 module.setDisplay(values);

 // Set the display to low intensity. High intensity is very bright and
 // uses more power.
 module.setupDisplay(true, 2); // where 7 is intensity (from 0 to 7)
}

void loop(){
 // This is an example number from 0 to 99.9999 you would like to display.
 float theNumberToDisplay = 12.5432334;

 // Where do you want to show the number, on the LEFT side, or the RIGHT of the display?
 int positionToDisplayIt = LEFT;

 // How many decimal places to show - must be 1 or 2 in this example code
 int numberOfDecimalPlacesToShow = 2;

 // Call the function to display the number
 displayNumber(theNumberToDisplay, positionToDisplayIt, numberOfDecimalPlacesToShow);
}

void displayNumber(float numberToSplit, int whichSide, int numOfDPs){
 // The number to be split should be a float from 0 to 99.9999
 // If is below zero or equal to or over 100, then just display ----.
 // numOfDPs is the number of digits after the point, only 1 or 2 are acceptable values
 if(numOfDPs > 2 or numOfDPs < 1)numOfDPs = 1;

 // Extract the digits from this number.
 numberToSplit = (int)(100 * numberToSplit);
 theDigits[0] = (int)(numberToSplit/1000);
 theDigits[1] = (int)((numberToSplit - (1000*theDigits[0])) / 100);
 theDigits[2] = (int)((numberToSplit - (1000*theDigits[0]) - (100*theDigits[1]))/10);
 theDigits[3] = (int)(numberToSplit - (1000*theDigits[0]) - (100*theDigits[1]) - (10*theDigits[2]));

 // Find and store the byte variables required to show these digits
 int dispDig[4];
 if(theDigits[0] == 0) dispDig[0] = 0; // Hide a leading zero if there is one
 else dispDig[0] = displayDigits[theDigits[0]];
 dispDig[1] = displayDigits[theDigits[1]] + 128; // Apend the dp onto the second digit
 dispDig[2] = displayDigits[theDigits[2]];
 dispDig[3] = displayDigits[theDigits[3]];

 // If we are only showing one DP, then leave last character blank to make things more legible on the display
 if(numOfDPs == 1) dispDig[3] = 0;

 // Make sure that the number passed to the function was >= 0 or <100, otherwise show an error with ----.
 if(numberToSplit/100 < 0 or numberToSplit/100 >= 100){
   for(int i = 0; i < 4; i++) dispDig[i] = 64;
 }

 // Find if number to be shown on the left or the right side of the display
 int offset = 0; // LEFT by default
 if(whichSide == RIGHT) offset = 4;

 // Update the values in the values array used by the display.
 values[0+offset] = dispDig[0];
 values[1+offset] = dispDig[1];
 values[2+offset] = dispDig[2];
 values[3+offset] = dispDig[3];

 // Update the display itself with the new values.
 module.setDisplay(values);
}