Over the last two years since we published our article Solar Powered Poultry Lighting we have designed and put together over 100 successful poultry lighting systems ranging from one bulb one hen hen houses to commercial poultry houses containing 1000’s of birds.
During that time we have developed and enhanced the system to the point that it is ready to be presented as a complete package at a reduced cost.
Poultry Lighting
The key components of any poultry lighting system are as follows:
A 12V powered programmable timer which can be used to automatically turn the lights on before dawn, off during the day, on before dusk, and off in the early evening.
Energy efficient 12V light bulbs and light fittings.
A reliable deep cycle battery.
…and for solar powered systems, a suitable solar panel.
The New REUK Super Poultry Lighting Controller
NEW Version 3 of our poultry lighting controller, the REUK Super Poultry Lighting Controller is now available for sale in our REUK Shop. Click here to purchase and/or for more information: REUK Super Poultry Lighting Controller.
The Timer
After trying many different programmable thermostats and programmable timers we have settled on one excellent timer: the Tesco TE7. This is actually a mains powered plug-in programmable digital timer which can be programmed with up to ten ON’s and OFF’s per day: you just need two, one to turn the lights on and off in the morning, and the other to turn then on and off in the evening.
In the article Convert Digital Mains Timer to Low Voltage we describe how this timer can be modified, and a relay board added so that it can be powered directly from a 12V battery and used to switch low voltage lighting on and off. This converted timer is available for sale in the REUK Shop for £21.99: Converted Timer.
Poultry Lighting Controller – Standard
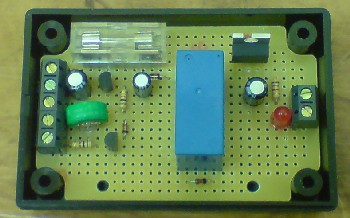
In order to use this converted timer as a controller for poultry lighting, our standard solution needs to be enhanced. First of all, if LED spotlights are to be used (as we recommend), a low drop 12V regulator is essential to ensure that the sensitive bulbs are never exposed to a too high voltage. Secondly, a fuse is necessary to protect against short circuits or overloading. Finally, having to connect up a mess of wires increases the chance of mistakes, everything gets tangled up, and the system becomes complicated and confusing. In order to counter that, we have made all connections on the controller circuit board itself, so that the output from the circuit can be connected directly to the light bulbs.
We are now able to offer this complete electronic poultry lighting controller (including the modified Tesco TE7 programmable digital timer) for just £28.99.
Note that this controller has a backup rechargeable battery fitted which will stored your programmed ON and OFF timer settings for 100+ hours if the timer is disconnected from the battery – during battery charging for example.
REUK Poultry Lighting Controller – Light Detector
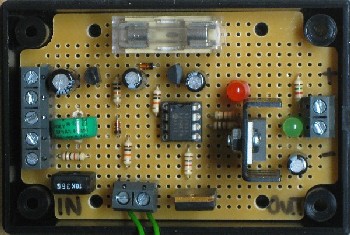
Pictured above is the all new REUK poultry lighting controller with integrated light detector. For situations in which power consumption must be kept to a minimum, this new controller automatically switches off the lights when the ambient light conditions are bright enough. Therefore on sunny mornings and evenings, the artificial lights will be used much less ensuring that plenty of charge is available in the battery bank on those days when it is very cloudy and dark outside. A second enhancement is the addition of a heatsink which enables more lights to be controlled – up to 10 Watts – by this device.
We are able to offer this controller with light detector override (including the modified TE7 programmable digital timer) for £38.99.
REUK Poultry Lighting System Connection
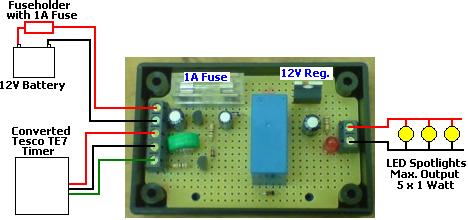
Pictured above is the connection diagram for the REUK poultry lighting control system. The first light bulb is connected directly to the circuit output. If more than one bulb is required, subsequent bulbs are connected in parallel as shown in the diagram. This circuit can power up to five 1 Watt LED spotlights – easily enough for a hen house with 30+ birds.
As shown below – connecting up the new advanced poultry lighting controller is pretty much exactly the same, the difference being the additon of the light detector and the ability to power up to eight to ten 1 Watt LED spotlight bulbs.
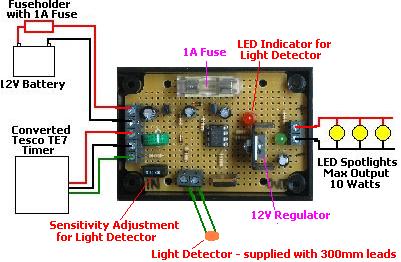
The light detector must be positioned so that it is able to detect the ambient lighting conditions – usually achieved by pointing it out of a window. It is supplied with 30cm long leads, but these can be extended if required to up to 5 metres for convenience. The key thing is to ensure that the artificial lights in the hen house do not shine onto the light detector.
The programmable digital timer is still used to set the ON and OFF times when the artificial lights are to be used. The light detector simply acts as an override which will automatically turn off the lights if during the timer-set ON periods, they are not necessary.
Calibration of the threshold light level (at which the lights turn on/off) is very easy. On the circuit board is a sensitivity adjuster which can be manipulated with a small screwdriver. Rotating this clockwise increases the sensitivity – i.e. the controller thinks it is darker and so turns on the lights more often. Rotating it anti-clockwise reduces the sensitivity – i.e. the controller thinks it is brighter, and so the lights are on less often. Either in the morning or in the evening, when the lighting conditions match the threshold at which you would like the lights to turn on/off, turn the adjustment all the way clockwise. The red LED will be on. Very slowly turn the adjustment anti-clockwise until the red LED just turns off – calibration is complete.
Whenever it is darker than your set threshold (and the timer is set to ON) the lights will be turned on. Ideally the chosen ambient light level threshold should be such that the artificial lights no longer make much difference to the overall brightness in the house. Whenever the ambient lighting conditions are darker than the set threshold, the red LED will be on.
In order to prevent the lights from flashing on and off rapidly when the ambient light level is close to the threshold, the lights will only turn on if the ambient light level is continuously darker than the threshold for 10 seconds. Similarly, before turning the lights off, the ambient light level must be brighter than the threshold continuously for 10 seconds.
Note that in addition to the 1 Amp fuse fitted to the circuit board itself, a second fuse must be fitted as close as possible to the positive terminal of the battery to protect the battery from being short circuited.
If a PV solar panel is to be used to keep the battery charged up, it should be connected directly to the battery – positive of solar panel to positive of battery, and negative of solar panel to negative of battery.
Putting Together a Poultry Lighting System – Lights, Battery, and Solar Panel
The only complicated part of putting together a poultry lighting system is specifying the number of lights, the size of battery, and if applicable, the necessary power output of solar panel.
Number of Light Bulbs
We always put our poultry lighting systems together with MR16 1 Watt LED spotlights. These are highly efficient, generate no heat, and cast a light equivalent to a 10-20 Watt halogen bulb. For the majority of systems (less than 20 birds, low ceiling height, and an area of less than 30 square feet) we have found that just two 1 Watt bulbs is perfectly adequate; for very small hen houses just one bulb is adequate. If your hen house has a high roof, add an extra bulb, and if the area of your hen house is larger add one or more extra bulbs. Note that with this system it is always possible (and very easy) to add an extra bulb or two at a later date if required (but we’ve still never had a customer come back for additional bulbs).
Size of Battery
A sealed deep cycle battery must be used. This is a maintenance free battery designed to be discharged deeply (very unlike a car battery for example). Assuming the artificial lights will be on from say 4-9am and again from 3-7pm, that is a total of 9 hours per day. The load on the battery is 0.150A for the first bulb, and then an additional 0.090A per additional bulb.
The battery should not be allowed to discharge below 40% charge otherwise it’s lifetime will be reduced, and ideally the battery should be able to power the light bulbs for 10 days from a full charge. Therefore the following simple calculation gives you the size of battery required to meet these criteria:
For example, with two bulbs the total load would be 0.15 + 0.09 = 0.24A. If we have the lights on for 9 hours per day, we would need a battery of at least 17 x 9 x 0.24 = 37 Ah if we want 10 days of power without going below 40% charge on the battery.
Obviously, as the calculations show, you can use a smaller (and therefore cheaper) battery if you are willing to recharge it more frequently and/or risk the battery getting deeply discharged if you forget.
Power Rating of Solar Panel
If a solar panel is to be used to keep the battery charged up, it needs to be capable of putting more power into the battery than the battery is using to power the lights. It is unfortunate that poultry lighting is required at the exact time of year when the sun is at its lowest in the sky and most frequently hidden behind clouds! Therefore you have to assume that the solar panel will give only 1-2 hours per day at its rated power output when making calculations – 1 hour at the top of Scotland, and 2 hours at the bottom of England.
The following calculation gives you the minimum power rating of the solar panel used:
For example, with a two-light system (total load 0.24A, on for 9 hours per day) in sunny Devon (expect two good hours of solar generation per day in winter), the solar panel must be rated at at least 12 x 9 x 0.24 / 2 = 13 Watts if it is to keep the battery charged.
Note that money can be saved if a smaller solar panel is used, and the battery is manually charged (using a plug-in mains charger) during periods of bad weather.
Shopping List
Having read through the above you will hopefully be able to work out the size of system which will work for you. (If not feel free to email neil@reuk.co.uk with full details of what you are trying to achieve.) You need the following:
From REUK you will require:
1 x REUK Poultry Lighting Controller @ £28.99, or the new lighting controller with light detector override @ £38.99.
1 x Fuse Holder with three 1 Amp fuses* @ £1.29
* same fuses as used on lighting controller board.
MR16 Bulb Holders @ £1.59 each – one per bulb.
Lengths of good quality insulated red and/or black cable @ £0.15 per metre.
Please email neil@reuk.co.uk with details of your order and we’ll send you an invoice.
You will also require:
1 Watt MR16 Spotlight bulbs – we no longer sell these. We recommend you purchase from here: MR16 LED Spotlights.
1 x deep cycle battery. We do not sell these, so click here to read the article 12V Deep Cycle Batteries for Solar for our recommendations.
You may require:
1 x 9 Watt plug in mains 12V battery charger (for overnight charging of batteries of less than 10Ah), or a 36 Watt 12V battery charger for faster charging of larger batteries.
and you may also require:
1 x PV Solar Panel. We can supply these 3 Watt solar panels for £19.99 each. If you need a larger panel, we recommend you purchase here: 12V solar panel (of particular interest: 5W solar panel or 15W solar panel).
Finally:
If is very useful to have an old car battery to which you can connect your system if/when you disconnect the main battery for recharging. Ask any mechanic and they’ll be more than happy for you to take one away with you free of charge.
Comments
|