Controller for Heater used to Prevent Condensation on Telescope Mirror

A common problem for amateur astronomers is condensation forming on the mirror in their telescopes. During the night the mirror cools down, and then in the morning as the air warms up, condensation forms on the mirror which is colder than the surrounding air. The same thing happens to the surface of a bottle when you take it out of a fridge, but for a telescope it is problematic as condensation deteriorates the reflective coating on the mirror, and of course a foggy coating reduces the quality of the star images obtained by the telescope.

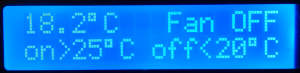
One solution to this problem is to warm up the mirror so that it remains 2 to 5 degrees Celcius above the ambient air temperature – something which can be achieved using a heating element and a thermostatic controller. If the mirror gets too cold, it will be covered in condensation. If the mirror gets too hot, it could warp. Therefore accurate control of the heating element is essential.

telescope condensation prevention controller with heater

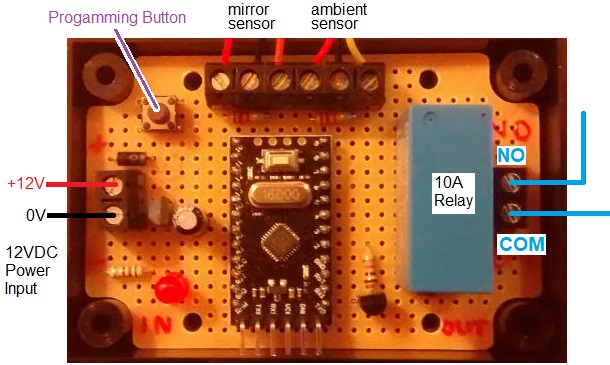
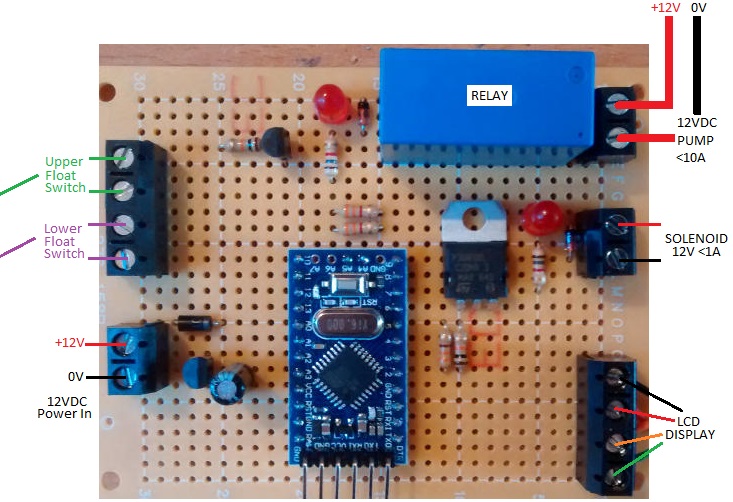
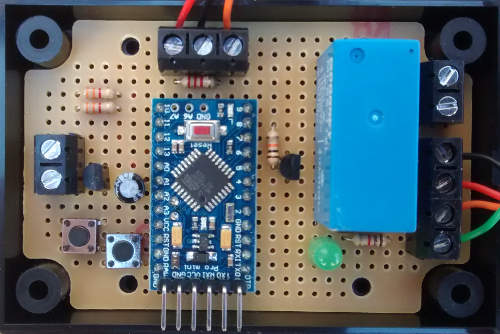
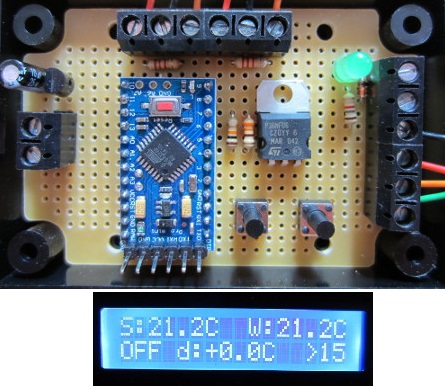
Pictured above is one such thermostatic controller we recently prepared for a customer loosely based around our 2013 Solar Water Heating Pump Controller.

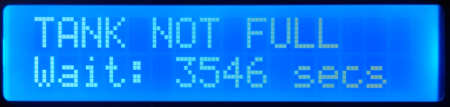
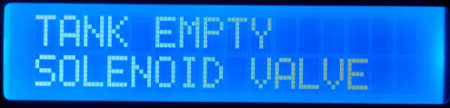
This device has two ds18b20 digital temperature sensors – one which attaches behind the mirror of the telescope and the other which measures the ambient air temperature. When the temperature at the mirror falls to within 2°C (or any other user programmable value) warmer than ambient, the heating element is switched on (via the onboard relay). The heating element stays on until the mirror has heated up to be at least 5°C (or any other user programmable value) warmer than ambient.

We used a non-waterproof sensor at the back of the mirror as this area remains dry and that sensor needs to respond to quick temperature changes. (The protection on waterproof temperature sensors slows down their response to temperature change.) We did however use a waterproof sensor to measure ambient air temperatures because that sensor is exposed and ambient air temperatures change relatively slowly.

The heating cycle continues automatically ensuring condensation does not form on the mirror, and the mirror is not over heated. This is a 12VDC powered controller managing a 12VDC heating element so that it can be battery powered when used at remote locations.

If you need a user programmable thermostatic controller for your telescope heating element, please email neil@reuk.co.uk with details of your requirements.

Triple Independent Repeating Timer for Lighting Control

Pictured below is a bespoke timer we recently made for a customer which includes three user programmable independent repeating on/off timers for controlling LED lighting.

three independent timers with a single master controller

This device built around an Arduino Pro Mini has three 12V outputs each of which can be set to turn on for from 0.5 to 15 seconds (in 0.5 second steps) and then turn off for from 0.5 to 15 seconds (in 0.5 second steps). This is a repeating timer, so each of the independent on/off cycles continues for as long as the timer is powered.

The user’s programmed settings are stored in non-volatile memory, so whenever the device is disconnected and then reconnected to the 12V power source, the timers continue as previously set.

If you need any kind of timer, please email neil@reuk.co.uk with details of your requirements.

28 Day Timer

Pictured below is a device we recently made to turn any typical 24 hour 7 day timer into a 24 Hour 28 Day Timer.

28 Day Timer

This particular unit was designed to run a pump for 20 minutes once every 28 days to supply an unattended irrigation system header tank with water. The user simply has to programme their existing programmable 7 day timer to turn on for the desired duration once per week. Our add-on board detects when that timer’s internal relay closes, and every fourth time (i.e. fourth week), it closes its own relay which turns on the pump.

Red LEDs on the board are used to show which week it currently is out of the four weeks that make up 28 days, and those LEDs also flash whenever the timer is on to give visual confirmation of the status of the system.

Programmable digital timers have a back up battery which ensures that time is kept accurately during a power cut. Our board stores the current week in memory, so that in the event of a power cut, it will remember which week it was in when power is restored.

If you need any kind of special timer, please email neil@reuk.co.uk with details of your requirements.

μduino Smallest Arduino Compatible Board – ATMEGA32U4

Pictured below are photographs of the top and bottom of prototypes of the new μduino, an Arduino-compatible board with dimensions of just 12x12mm making it probably the smallest Arduino every built – just a little bigger than a microSD card.

uduino smallest arduino compatible board

The μduino is smaller in size than the Digispark (with its ATTiny85 chip and 6 I/O pins), but uses the same ATMEGA32U4 microcontroller found on the much more powerful Arduino Leonardo offering 20 I/O pins including 6 analog and 14 digital I/O ports, 7 PWM channels, and a lot more memory.

μduino is now (early August 2017) fully funded on Crowd Supply (a crowd funding website similar to Kickstarter and Indiegogo), easily reaching and exceeding its funding goal with 11 days to spare.

μduino can be set up to operate at either 3.3V or 5V depending on the requirements of your project and any connected sensors.

The tiny size of µduino was achieved using a smaller hole separation (1.27mm vs 2.54mm) relative to standard boards, and packing the components tightly together on both sides of the board.

For full details and/or to place an order for a µduino @ US$18 (shipping on or after September 20th 2017), click here for µduino on the CrowdSupply.com website.

μduino Specs

ATMEGA32U4 microcontroller
6x Analog I/O ports
14x Digital I/O ports (including Rx/Tx)
Status LED
Dual-power modes for 3.3V and 5V operation (accepts up to 16V)
1x Power output (3.3V or 5V depending on what mode is selected)
3x Ground ports
1x Analog reference voltage port
Reset button
16 MHz precision crystal oscillator
MicroUSB port for easy programming and prototyping

Rainwater Toilet Pump Controller with Display and Timer

Pictured below is another of our rainwater toilet pump controllers  which we recently built and supplied.rainwater toilet pump controller with display and timer

This particular unit will be used in a system configured as follows:
There is a large water butt with 2000 litre capacity (to which a further 1000 litre capacity will soon be added). There is a 210 litre header tank which gravity feeds the toilets in the property. The header tank has a float switch near the top to detect when it is full, and a float switch near the bottom to detect when it is nearly empty. The pump chosen can fill the header tank from empty in around 6 minutes, and the pump has its own float switch protection (so that it will not run dry if the water butt is empty). Finally there is a solenoid valve fitted to a mains water supply which when turned on, will fill the header tank.

header tank not full display rainwater toilet pump controllerThe controller has a display which is used to show the status of the header tank – full, not full, or empty – and also the status of the pump and solenoid valve.

solenoid valve on water butt empty display

Once an hour, the controller will turn on the pump if the upper float switch indicates that the header tank is not full. The pump will run until the upper float switch floats on a full tank OR for 8 minutes since if the pump runs that long, the water butt must be empty or there is a problem with the pump.

If at any time (except while the pump is running) the lower float switch indicates that the header tank is empty, the solenoid valve will open sending mains water into the header tank until the upper float switch indicates the tank is now full.
After another hour has passed, the controller will attempt to top up the tank with rainwater as normal, and will only top it up with mains water if the tank is empty.

If you need a rainwater toilet pump controller, email neil@reuk.co.uk with details of your requirements. Take a look at some of our previous controllers here: rainwater.

Target Shooting Lights Controlling Timer

Pictured below is a timer for use in competitive target shooting. Usually we make turning target controllers which turn the target to face and away from the shooter at the required times. This controller instead is for use with a fixed target, using a red and a green light to tell the shooter when to shoot.

shooting target lighting controllerThe red light starts off on. The start/stop button is pressed and the range master gives a vocal command for shooters to load. After 30 seconds, the red light turns off and the green light turns on – shooting commences. After a user programmable timer period has elapsed, the red light turns on again, the green light turns off, and shooting stops.

With this particular controller, the available timing options are fixed as 4, 6, 8, 10, 20, or 150 seconds. The timer option button is used to cycle through those options with red indicator LEDs used to show which option is currently selected. (We also make timers like these with a physical display and the ability for the user to change the values of the timing options instead of having a fixed selection – see here for details of some of our other shooting timers.)

The type of bulb to be used with controller is pictured below: a low current 12VDC powered 22ds LED bulb from Onpow.22ds 12vdc LED bulbIf you need any type of shooting range timer, please email neil@reuk.co.uk with details of your requirements.

Conservatory Cooling Fan Controller

We sell a wide range of types of differential temperature controllers which are primarily used in solar hot water systems. However, with slight modifications, they can also be put to good use in other scenarios.

thermostat for conservatory coolingPictured above is an Arduino Pro Mini based fan controller we made for use in conservatories and other sunny rooms to help to keep the temperature from getting too hot.

This device can be used to turn on an extractor fan when the temperature in the room gets above a user set value, and keep it on until the room temperature has fallen below a second user set value. By dumping excess hot air from the room, the room’s temperature can be kept in a comfortable range.

display for conservatory cooling fan controller

In the photograph of the device’s display above, the air temperature is showbn to be measured as 18.2C. The fan (which is currently off) will turn on when the air temperature goes over 25C, and then turn off again when the air temperature falls below 20C.

We have also previously made these types of thermostatic controllers to automatically drive hot air from a sunny conservatory into cooler regions of the house. An insulated conservatory can still get very hot even in the winter months, so sending the hot air to the cooler side of the house is an easy and cheap way to reduce heating bills.

Solar Water Heating Pump Controller – East West Aspect Collectors

Pictured below is a solar water heating pump controller which we recently made for use within a system which has two solar collectors – one on an East-facing roof and one on a West-facing roof.

solar water heating pump controller for use within a system with east and west facing solar collectors

We have previously made an East West Solar Water Heating Pump Controller for use in a more complex system which controlled valves which were used to select whether to take solar heated water from the East or from the West-facing collector. The above pictured controller however is just based around our 2014 Solar Water Heating Pump Controller, with the additional of a third sensor and a modified display output.

display for east west solar water heating pump controller

The standard 2014 controller will turn on the pump when the solar collector is a user programmed number of degrees hotter than the tank or pool to be heated. Our modified East/West version instead runs the pump whenever either the East or West-facing collector is that user programmed number of degrees hotter than the tank or pool.

The water in the system is pumped from the tank or pool, up through both solar collectors in turn, and back again in a loop. Therefore, this simpler version has the disadvantage that water from the hotter collector (or from the tank/pool) may cool a little in the colder collector as heated water flows through it. However, overall the system is pretty efficient considering the disadvantage of having to face collectors to the East and West instead of to the more optimal South (in the Northern Hemisphere) due to the orientation of the building.

If you need any kind of solar water heating pump controller, please email neil@reuk.co.uk with details of your requirements.

12V Low Voltage Disconnect with Display and SD Card Datalogger

12V low voltage disconnect with display and sd card dataloggerPictured above is a low voltage disconnect device which we recently made for a client. It offers all of the battery monitoring, protecting, and datalogging functions and features of our REUK Programmable Low Voltage Disconnect with Display and Datalogger, but with the added benefit of an on board microSD card to store the measured battery voltage once per minute.

low voltage disconnect sd card datalogger

The voltage data is written to a simple text file on the SD card. When the battery is connected to the low voltage disconnect and powers it, POWER CONNECTED is written to the log file. Then each subsequent minute, the battery voltage is written to the file preceded by the number of minutes since the power was last connected. For example the line 6,13.98 indicates that 6 minutes after the power was connected, the battery voltage was measured to be 13.98V.

While the pre-existing basic datalogging of the LVD is useful for constantly displaying the minimum, maximum, and average measured voltages, every now and then it is good to have the option to copy the data from the SD card to a PC for more detailed analysis and plotting etc.

If you need any kind of datalogger, please email neil@reuk.co.uk with details of your requirements.

Solar Water Heating Pump Controller for Distant Pool

Pictured below is our standard 2016 Solar Water Heating Pump Controller with Datalogger. We recently made a modified version of this controller for use in a particular situation where the standard unit would not be very efficient.

2016 SOLAR PUMP CONTROLLER WITH LCD DISPLAY AND DATALOGGER. Solar water heating pump controller with backlit display to show temperatures and system status information and a datalogger
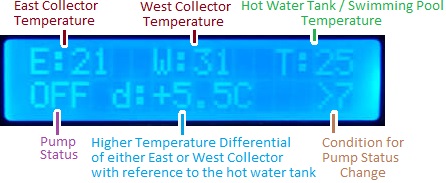
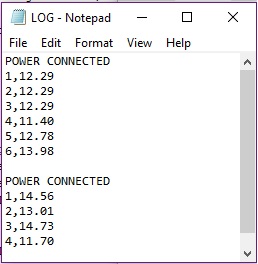
In this case, the controller was to be used to heat a swimming pool. The problem was that this pool was located 30 metres away from a garage where the controller would be fitted, with 50mm water pipes already installed running underground to and from the pool from the garage (on the roof of which were installed solar water heating panels). There was therefore no easy way to retro fit a temperature sensor at the pool – that would necessitate digging a new 30 metre long trench, fitting sensor cable into an armoured tube, and burying it.

It was however possible to fit a temperature sensor to the return water pipe where it emerged in the garage, but the contents of that pipe would cool down much faster than the large volume of water in the pool, and this would result in the pump being turned on frequently unnecessarily, often cooling the pool instead of heating it.

To get around this problem, the controller was modified to provide additional features. The key feature was that the pump would not be turned on until the temperature of the solar panel exceeded a user programmable value. When this threshold is reached, the pump is run for a user programmable number of seconds (TD) which circulates the water through the system sufficiently to get an accurate measurement of the temperature of the pool water. When TD seconds have elapsed, if the temperature differential between the solar panel and pool exceeds the user programmed differential (diffOFF), the pump will continue to run until the differential falls below diffOFF – standard operation for the 2016 controller.

If however after the test run of the pump, the differential is not high enough, the pump will be turned off, and the temperature of the pool sensor will be saved. For up to the next four hours this saved value of the pool temperature will be used rather than the sensor temperature (which will rapidly fall when the pump is turned off). The pool temperature over the course of 4 hours will not fall by more than a degree or two, so using this saved value is acceptable for efficiency. During the 4 hours, if the temperature differential exceeds the second user programmed differential (diffON), the pump will be run as per standard operation and after TD seconds the controller will start to use the current pool temperature sensor measurement instead of the previously saved value as the pipe in the garage will now be at pool temperature. The pump will continue to run until the differential falls below diffOFF.

If during the 4 hours, diffON is not achieved, the controller will wait until the solar panel temperature exceeds the user programmed temperature before running the pump for TD seconds again and repeating the above processes.

Overall these modifications (together with a few additional features not described above) will result in a far more efficient system than our standard controller would have given and less wear on the pump.

If you have any special requirements which are not met by our standard controllers, please email neil@reuk.co.uk with details.