Saving Arduino Collected Data to Text File on Windows

We are often asked how to log data from an Arduino to a text file saved on a Windows PC. This is very simple with Linux and Mac OS, but it can be also be achieved on Windows with minimal effort.

We make a lot of dataloggers, the majority of which either store data internally and then output a summary to an LCD display, or dump all collected data to an SD card for later processing and analysis on a PC. However, it is relatively simple to collect data from any number of sensors connected to an Arduino board and send that data over a serial connection directly to a text file on a PC.

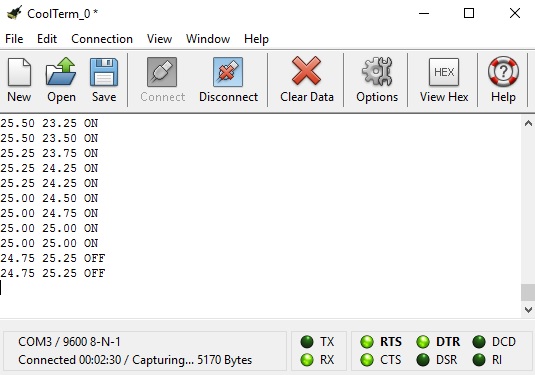
There are many software options available, but we typically use CoolTerm (available free of charge here: download CoolTerm) which is a serial monitor which will also capture transmitted data to a text file and automatically add time stamps to each line of data which are essential for a good datalogger.

As an example we slightly modified the code for our 2016 solar water heating pump controller so that every time data is taken from the two connected digital temperature sensors, those measurements and also the system status (pump ON or OFF) are output through the serial port to a connected PC. (Full details on generating Serial output from an Arduino are available here: Arduino Serial from the official Arduino Reference site.)

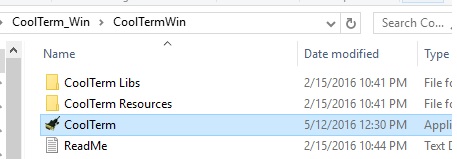
Download CoolTerm from the link already provided above. You will end up with an approximately 10MB zip file which needs to be extracted. When that is done, go into the folder created, and double click on the CoolTerm application.

Launch CoolTerm application
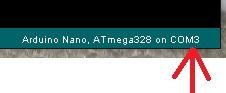
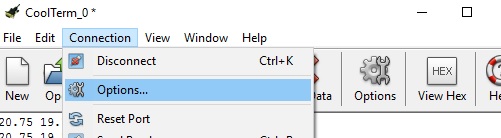
Click on Connection > Options and then in Serial Port Options select the Port you would like to use. If you are using the Arduino IDE, in the bottom right hand corner of the window will be shown the type of board you are using followed by COM# where # is the number of the port your Arduino is currently set up to use and is also the port you should select within CoolTerm).

Selecting the serial COM port to use with CoolTerm with ArduinoAt the same time set the baudrate to 9600 (making sure that in the sketch you have uploaded to your Arduino, you have also included Serial.begin(9600); in the setup() function.

CoolTerm connection options

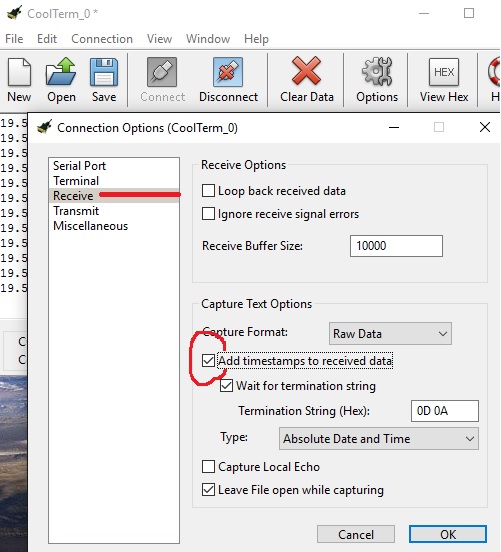
Assuming that you would like all data to be timestamped (adding the date and time to every line of data sent), do Connection > Options > Receive and check the ‘Add timestamps to received data’ box.

timestamp serial data from Arduino and store in text file on PC

Then to have any serial data from your Arduino automatically stored in a text file on the PC, do Connection > Capture to Text File and then click on Start. You then just have to set the name for the file that you would like your data to be stored in, and your datalogger is complete.

arduino coolterm serial monitor showing arduino collected data

To stop collecting data, you can either click on the large Disconnect icon, or if you want to stay connected to the Arduino board, do Connection > Capture to Text File > Stop.

Once you have either disconnected the Arduino board or Stopped the capture, you cannot then restart and append data to the same file – you can only overwrite the original file or start a new one. If you want to pause capture and then restart it to append to the same file, do Connection > Capture to Text File > Pause to pause, and then Connection > Capture to Text File > Resume to resume it at a later time.

Data collected from solar pump controller from Arduino via Serial and CoolTerm to PC

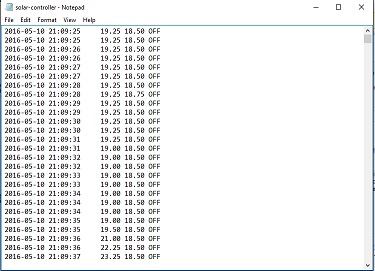
When you have finished capturing data, you will end up with a text file of everything captured which can be processed and visualised using Excel or a similar application.

Pistol Shooting Training Timer

Competitive pistol shooting trainer timerPictured above is a timer we recently made for use in competitive pistol shooting training. There is a microswitch under a flat plate on which the pistol lies. When the shooter picks up the pistol, the timer starts counting down a user set value of either 6, 8, or 10 seconds after which a buzzer sounds briefly telling the shooter to replace the pistol. The duration of the timer is set using a button to step through the three possible options, with an LED (red, yellow, or green) illuminated to show the currently selection option. This will all be fitted inside an enclosure with the microswitch connected through the circuit board, and the LEDs and timer mode selection button mounted in the lid of the enclosure.

This timer is built around an Arduino Pro Mini board and uses its internal clock for timings as it is accurate enough over such short timing intervals (+/-1 millisecond or better over 10 seconds) when considered in conjunction with the time it takes the microswitch to open/close, or sound to actually start to emit from a buzzer when it is first powered.

If you need any kind of special timer, please email neil@reuk.co.uk with details of your specific requirements.

Testing Accuracy of micro:bit Internal Clock

At REUK.co.uk we make a lot of timers for a wide range of different applications. Most projects only call for a timer to be accurate to within around 10 seconds per hour. For those that require greater accuracy, we sometimes use a real time clock such as the DS3231, and other times (when the microcontroller we are using is inaccurate but CONSISTENTLY inaccurate) we just calibrate the timer against a previously tested and known accurate timer.

While having a first play around with MicroPython on the micro:bit, we ran a few one minute tests of the accuracy of the internal clock. When hand timing with a stopwatch we consistently found that one micro:bit minute was actually around 59.85 seconds. That is of course very close to the 60.00 seconds of a true minute and the error could well have been due to human error with the stopwatch, but it did appear that our micro:bit was running a little fast (since its ‘minute’ was finishing quicker than a true minute). Being 0.15 seconds fast every minute may not sound a lot, but it equates to the internal clock being minutes fast per day. Had the timing appeared to be a tiny bit slow, it could just have been that there was a delay due to the time taken for the micro:bit to do internal processing etc, but as the timings appeared to be fast, they must actually be fast.

In order to test this properly, we connected a relay via a transistor to one of the digital output pins of the micro:bit. The NO and COM terminals of this relay were in turn connected in parallel across the contacts of the start/stop button on a previously cannibalised stopwatch. We then wrote a small MicroPython script to briefly set the output pin to digital HIGH to start the stop watch, and then after 10 minutes sleep(600000) – i.e. sleep for 600,000 milliseconds, 600 seconds, 10 minutes – again briefly set the pin high to stop the stopwatch.

testing the micro:bit internal clock accuracy

Running this test ten times and averaging the results we found that the micro:bit ten minutes was actually 9 minutes, 58.51 seconds (598.51 seconds instead of 600.00). The timings were very consistent with the shortest and longest measured times both being just 0.03 seconds away from the average – a tight range of 9m58.48s to 9m58.54s measured over the ten ten minute periods.

Looking at the average time, 9 minutes 58.51 seconds is 0.248% faster than 10 minutes. Being 0.248% fast is not a big deal when timing events lasting seconds or a couple of minutes, but over the course of a 24 hour period, our micro:bit would gain 215 seconds, or over 3.5 minutes which is not insignificant.

The consistency we had found in the inaccuracy was a very good sign. It made manual calibration of our micro:bit a possibility so that we would forever know (at least if timing accuracy is not significantly affected by changes in ambient temperature or input voltage) that this particular micro:bit’s clock could be trusted without the need for an external real time clock (RTC).

The Python command we used to get the micro:bit to sleep for one second was sleep(1000). Apparently with our micro:bit this resulted in it sleeping for a little less than one true second, therefore we needed to increase the sleep time by the 0.248% that the internal clock was now known to be fast. It would be nice to use the command sleep(1002.4833), but unfortunately it is only possible to use a whole number (integer) value – i.e. sleep(1002) or sleep(1003). Either of these approximations would make times measured by our micro:bit 5 times more accurate, but that is still around 45 seconds too fast per 24 hours – not good enough.

Therefore, when we want to time long intervals – hours and days – we need to sleep for longer intervals such as sleep(601489.98) corresponding to 10 minutes to increase the accuracy possible. Luckily enough 601489.98 is almost exactly 601490 micro:bit measured milliseconds. So, in any projects which require us to measure long time periods with our micro:bit, we will count the number of our pre-calibrated 10 minute intervals have passed measured with sleep(601490). Now calibrated, our micro:bit should certainly be accurate enough for a wide range of future long duration projects.

The timing accuracy we found for our micro:bit before calibration was 25 ppm (parts per million) which compares favourably with the typical 50 ppm found with Arduino boards, and we found the consistency in timing inaccuracy to be better with micro:bit than we have previously found with Arduino. However, we could have been lucky or unlucky with our particular micro:bit board. We will need to repeat our experimentation with multiple micro:bits to find the typical timing accuracy of micro:bits in general in the future.

micro:bit Battery Capacity

In our recent blog post: micro:bit Power Consumption, we look at how much power the micro:bit draws at different input voltages while idle, illuminating the full array of 25 LEDs, or with the processor operating at 100% load carrying out calculations. In this post, we will look at how this power consumption relates to battery life.

The micro:bit is supplied with a 2xAAA battery holder. Assuming that the majority of users will put a pair of good quality alkaline cells into this battery holder for powering their micro:bit projects, we will use 3 Volts as the input voltage in the calculations to follow. Good alkaline cells start off at just over 1.5 Volts and maintain this voltage until it begins to drop off only when the cells are almost depleted of charge. (The calculations would be quite different if rechargeable NiMH cells were to be used for example since with an input voltage of 2.4-2.5V, the power consumption is notably lower.)

Referring to the table of power consumption results (available in the post linked to at the top of this post), with 3 Volts on the input we saw the following:

microbit power consumption with a 3V input voltagei.e. at idle (minimal processing and no LEDs on), power consumption is just 5.83mW, but with the processor working at 100% and all of the LEDs on, power consumption is over 43mW.

Good quality AAA cells typical hold a charge of somewhere from 800-1000mAh, AA cells from 1800-2400mAh. There are higher capacity cells available, but these are usually optimised for use with digital cameras and similar supplying high current briefly each time a picture is taken rather than the steady state constant low current typical for a micro:bit project. They also tend to be much more expensive.

battery life testing with micro:bitThe table above takes the power consumption data previously measured with a 3 Volt input voltage and shows for how many days the battery pack will last for a wide selection of different capacities. For example, if you had a processor intensive project which made use of all or nearly all of the LEDs at once, and a pair of 1000mAh Duracell Plus AAA cells, you could expect to get approximately 3 days of battery life. If on the other hand you had a project which was not processor intensive, did not make use of the LEDs, and used a pair of 2400mAh AA cells, you could expect around 50 days of battery life.

There are many factors above which will affect the real world battery life including the ambient temperature, the specific features of the project to be built, and of course any additional components, sensors, or devices to be powered at the same time as the micro:bit. However, it will hopefully give you a pretty accurate idea of what to expect and to inform your choices when you are choosing how to power your project.

Bookmark microbit.me.uk to view all our previous and future micro:bit related articles.

micro:bit Power Consumption

Having finally managed to obtain a micro:bit, the first thing we wanted to test was the power consumption at different input voltages.

The micro:bit is supplied as a kit together with a 2xAAA battery holder which plugs into the micro:bit, two cheap generic AAA cells, and a USB cable for connecting the micro:bit to a PC to upload your code to it (and which can also be used to power the micro:bit via the onboard voltage regulator).

The input voltage for micro:bit is labelled as 3 Volts. Alkaline AAA cells such as those offered by Duracell supply around 1.5-1.7 Volts each when fully charged. Rechargeable NiMH cells, something around 1.25 Volts. Therefore, since the micro:bit is designed to be battery powered by TWO AAA cells, it must be able to operate reliably from a wide range of input voltage – e.g. just 2V from a pair of depleted rechargeable NiMH cells, up to at least 3.4V to cope with a pair of brand new out of the box Duracell cells.

In order to test power consumption, we used the Microsoft Block Editor (available for use at the official micro:bit website) to build a simple project as shown below. Click on the image to see it in full size.

Power testing the micro:bit

This will first turn off all of the LEDs in the 25 LED array so the micro:bit is not doing anything apart from background processing. If the A button on the micro:bit is then pressed, all LEDs will light up and remain on for five seconds. If the B button is pressed, the processor of the micro:bit will be worked hard by generating 233,000 random numbers. (The reason that 233,000 was chosen was that it took the micro:bit 10 seconds to complete that many iterations of the loop, and that gave the time necessary to reliably measure the minimum and maximum current drawn by the micro:bit while under this heavy load).

Powering the micro:bit from a variable DC power supply starting down at 1.5V, the voltage was increased until it was sufficient to have the LEDs turn on. We found this voltage to be at around 1.80V. We then tested different input voltages from around 1.8V up to just over 4.0V in 0.2V steps with the micro:bit either resting, with all the LEDs on, and then with it doing repeated random number generation.

We found that the current draw fluctuated constantly (by around 1mA), probably due to the internal workings of the micro:bit which we have not yet studied in detail. We found that in all three tests for all input voltages, there was a minimum current, a maximum current, but the typical current draw was found to be around one-third of the way between the minimum and maximum. We called this the mean (average) for this rough and ready set of experiments and the final table of results is given below.

results of micro:bit power consumption experimentsEach row in the table shows a different input voltage. The Resting (Idle) Mean, LEDs Mean, and Working Mean have been described in the previous paragraph. P(Resting), P(LEDs), and P(Working) are calculated using Ohm’s Law that Power equals Current multiplied by Voltage.

It is immediately apparent the massive effect that input voltage has on total power consumption. At 1.83V input voltage with all the LEDs on, only 3.76mW is consumed, but with an input voltage of 4V, 78.7mW is consumed – 21x as much power. Even with input voltages of 3V and 2.4V (typical alkaline and NiMH rechargeable voltages respectively) the power consumption is 31mW compared to 14mW – more than twice as much. Therefore, unless you need the LEDs to be very bright, it is better (if power consumption is important to you) to use a low input voltage, or to use the built in PWM to reduce the brightness of the LEDs and therefore their power consumption.

For projects not requiring the LEDs, the power consumption is not so affected by input voltage. At idle, approximately twice as much power is consumed at 4V as it is at 1.8V. Under heavy load, more than three times as much power is consumed at 4V compared to 1.8V. Therefore, if the LEDs are not required, it is more power efficient to use a good voltage regulator to bring the input battery voltage down to around 2V than it is to just run the micro:bit at the battery voltage. Important things to consider if you intend to power your micro:bit by solar power or some other limited power source.

Finally we noted that the 10 seconds it took the micro:bit to generate 233,000 random numbers in our experimentation was completely unaffected by changes to the input voltage – i.e. it took 10.0 seconds with an input voltage of 1.83V and still took 10.0 seconds with 4.05V. Again this shows that where the LEDs are not being used, a low input voltage is the way to go if you need to minimise power consumption.

Bookmark microbit.me.uk to view all our previous and future micro:bit related articles.

micro:bit Arrives at REUK

After a long wait we have finally got our hands on a micro:bit, the fully programmable pocket-sized computer which will be given free of charge to every year 7 child across the whole of the UK – a total of one million units to be distributed by the BBC in partnership with a wide selection of commercial partners.

BBC micro:bit

BBC micro:bit LED array and buttons

We have many plans for our micro:bit, starting off looking at its power consumption and the practicalities of powering it with a PV solar panel. We will then move on to show how a micro:bit can be used with a range of renewable energy based systems, home automation, and other useful projects.

We will also be publishing (free of charge and in full detail) how a micro:bit (with a few additional external components) can be used to reproduce the functionality of all of the microcontroller and Arduino based products which we currently sell in our REUK Store, including our popular solar water heating pump controllers, battery monitoring devices, programmable timers, and more.

Bookmark microbit.me.uk to view all our previous and future micro:bit related articles.